The order entry screen functions described below apply to both regular and bar menu categories. Bar menu specific functions such as upcharge buttons and bar tabs appear only when a bar menu category is selected. Retail item buttons such as SKU, PLU and random weight barcodes are described here.
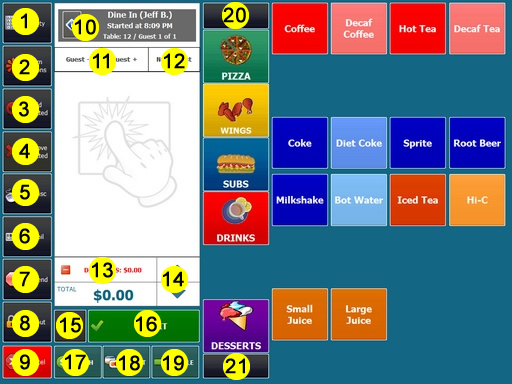
The order entry screen provides easy access to most common order functions and offers the user the ability to restrict access to functions based on the user permission. Refer to the image
| 1. | Quantity: Press the change the quantity of a order item or to remove a order item |
| 2. | Item Options: Press to add a prep order instruction for the selected item |
| 3. | Time: Press to show the time options screen where the order can be scheduled for a future date/time or the selected order item can be prevented from printing at the prep printers. |
| 4. | Remove: Remove the selected order item. Permission override may be required to remove items from a previously submitted order. |
| 5. | Misc Item: Press to add a MISC item to the order using the on-screen keyboard |
| 6. | Retail: Press to switch to view SKU, PLU, item lookup and price change buttons. Press again to hide the retail screen. |
| 7. | Suspend: Press to hold all items on the order. Useful when a new order must be entered before the current order has been submitted. All items are placed "on hold" and are sent to the prep printers the next time the order is recalled and submitted. |
| 8. | Log out: Press to log out |
| 9. | Cancel order: Press to cancel order and exit |
| 10. | Order Information: Press to view or modify order information, order alerts, customer information, table number, etc |
| 11. | Guests: Press to increase/decrease the number of guests |
| 12. | Active Guest: Press to change the active guest. Available only for order types that assign order items to guests |
| 13. | Discounts: Press to add or modify discounts |
| 14. | Order Scroll Up/Down: Press to scroll order items |
| 15. | Print Receipt: Toggle button to enable/disable receipt printing. This button is reset each time an order is started. The default setting is shown here. |
| 16. | Submit: Press to save order, print the customer receipt, prep tickets and update the remote display. |
| 17. | Cash: Press to submit order and settle using cash transaction type |
| 18. | Credit: Press to submit order and settle using credit card transaction type |
| 19. | Settle: Press to open order on settlement screen |
| 20. | Menu Categories Scroll Up: Press to view additional regular menu categories |
| 21. | Menu Categories Scroll Down: Press to view additional regular menu categories |
Order Item Quantity Adjustment

Order Entry Screen Quantity Adjustment
To change the quantity of any order item, use the Up/Down arrows to select the item and press the Qty button at the top left. Note that selecting a menu item optional is the same as selecting the menu item.
| 1. | Add/Subtract/Multiply: Press the add, subtract or multiply the amount shown from the item selected item's current quantity. If the item has a quantity of 1, pressing the Subtract button will have no effect |
| 2. | Reset Quantity/Start Over: revert to the value of the order item quantity when the Qty button was pressed |
| 3. | Assign to Next Guest: For Dine-In orders, assign the current item to the next guest. For example, if the table has 3 guests and the current selection is assigned to guest 3, pressing the button will assign the item to guest 1, pressing it again will assign to guest 2, etc. |
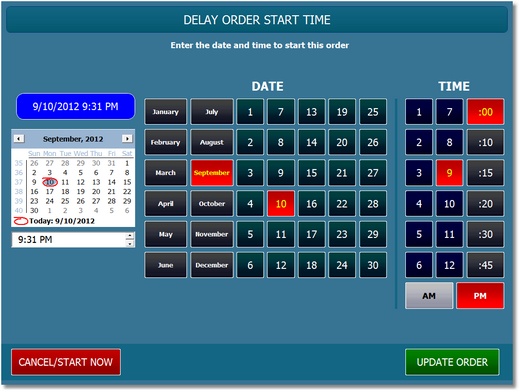
Delay Order Start Time
Orders can be scheduled for a future date/time. Press the Time button followed by the SET ORDER START TIME button to display the time entry screen. Use a physical keyboard to set the date/time using the calendar and time control on the left or manually set the date and time by pressing the buttons. The date/time is saved when the order is submitted. To clear the date/time, reopen the screen and press the CANCEL/START NOW button (and submit the order).
When changing the order start time:
| • | The prep ticket will print the start time at the top (using the same text settings for the prep ticket header items) |
| • | The customer receipt will print the start time at the top |
| • | The remote display application will display the order only after the specified date/time |
| • | The end of day can be run with open orders that are scheduled for a future date/time, unless the date/time has passed, in which case the order must be settled or voided. |
| • | The order will appear normally on the recall list (and web orders list) |
| • | The order will not appear on the server liability report unless the date/time has passed, in which case the order must be settled or voided. |
| • | The order will not be considered "open" on the time clock screen so that employees can still clock-out when the Prevent Open Orders Clock Out setting is set to Yes. |
Page url: http://www.amigopos.com/help/html/index.html?order_entry_screen_overview.htm


