Navigation: Bar Tabs >
Bar Tabs Overview


|
Navigation: Bar Tabs > Bar Tabs Overview |
|
Amigo Pos includes the ability to two types of bar tabs:
| 1. | Enter the customer name and (optionally) set a limit |
| 2. | Pre-authorize the customer's credit card for a pre-set limit |
All bar tab configuration settings are located in Back Office > Configuration > by clicking the Order Entry tab and then expanding the Bar Tabs settings. Read this entire help topic before using this feature.

Back Office > Configuration > Main Settings
Bar Tab Settings
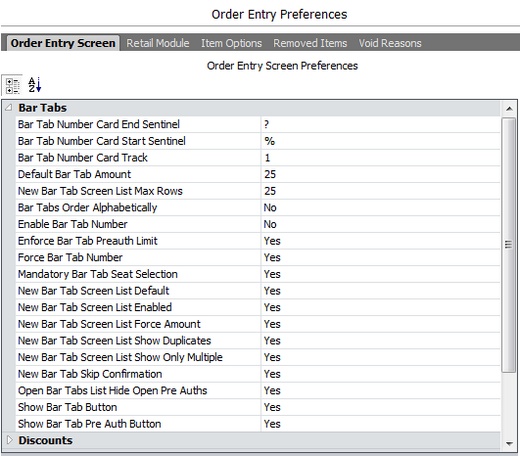
The following settings are shown in the Configuration > Main Settings > Order Entry Preferences:
| • | Bar Tab Number Card End Sentinel: Bar Tab Number card end sentinel character. Refer to the bar tab numbers topic for additional information. |
| • | Bar Tab Number Card Start Sentinel: Bar Tab Number card start sentinel character. Refer to the bar tab numbers topic for additional information. |
| • | Bar Tab Number Card Track: When using bar tab numbers in conjunction with magnetic cards. Refer to the bar tab numbers topic for additional information. |
| • | Default Bar Tab Amount: The default amount for which new bar tabs are pre-authorized. |
| • | New Bar Tab Screen List Max Rows: Enter the maximum number of rows to display on the list. Use a lower number for slower workstations |
| • | Bar Tabs Order Alphabetically: Set to Yes to order bar tabs alphabetically by customer name on the recall screen. Set to No to order bar tabs by time entered |
| • | Enable Bar Tab Number: Set to Yes to enable bar tab number entry after new bar tab pre-authorization. Refer to the bar tab numbers topic for additional information. |
| • | Enforce Bar Tab Pre-auth Limit: Do not allow the bar tab to exceed the pre-auth amount |
| • | Force Bar Tab Number: Set to Yes to force bar tab number entry (Enable Bar Tab Number must also be set to Yes). Refer to the bar tab numbers topic for additional information. |
| • | Mandatory Bar Tab Seat Selection: Force user to select a seat when starting a new bar tab |
| • | New Bar Tab Screen List Default: Set to Yes to display the list of previous bar tabs when the screen appears. Set to No to display the keyboard. The keyboard is displayed by default if no previous bar tabs exist. |
| • | New Bar Tab Screen List Enabled: Set to Yes to show the list of previous bar tab names and limits on the new bar tab screen |
| • | New Bar Tab Screen List Force Amount: Set to Yes to force the bartender to enter the amount after selecting a name from the list. Set to No to allow the bartender to use the previous limit. |
| • | New Bar Tab Screen List Show Duplicates: Set to Yes to include identical names on the bar tabs list |
| • | New Bar Tab Screen List Show Only Multiple: Set to Yes to include only names that appear more than once on the bar tab list (used to eliminate listing displaying customers) |
| • | New Bar Tab Skip Confirmation: Set to Yes to suppress the confirmation screen and immediately display the new bar tab screen after the New Bar Tab button is pressed. This setting is applied only if pre-auth bar tabs are not used. |
| • | Open Bar Tabs List Hide Open Pre Auths: Set to Yes to hide bar tabs with open preauth transactions on the open bar tabs list if the balance due is zero. This setting is intended for users that do not use the bar tab pre-auth feature. |
| • | Show Bar Tab Button: Set to No to hide the NEW TAB and TABS buttons on the order entry screen |
| • | Show Bar Tab Pre Auth Button: Set to No to hide the bar tab Pre Authorize button on the order entry screen |
To start a new bar tab, enter the initial drink order and press the new tab button.

Bar tab management on the order entry screen
To start a generic tab where only the customer's name is entered, press the Enter Name Only button. Enter the customer's name using the on-screen keyboard, confirm that the limit is correct and press Continue.
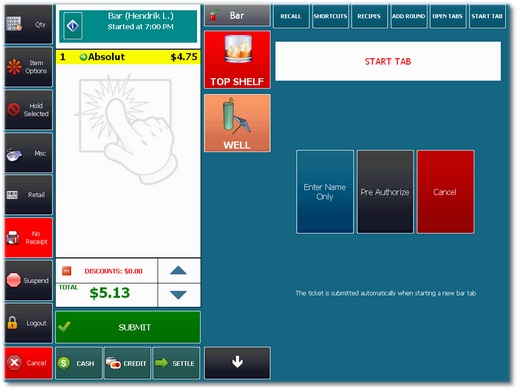
Starting a new bar tab
If the New Bar Tab screen is configured to show the list of previous bar tabs (as determined by the New Bar Tab Screen List Default setting described above), enter letters to filter the list until the name is found. The maxim number of names that appear at one time is determined by the New Bar Tab Screen List Max Rows setting described above. When selected letters to filter the list, the letters are cumulative so that the list is filtered by all of the letters, i.e. pressing A then B will filter the list to display names that start with AB. Press Reset List to clear the filter and start over.
Note that the name cannot be blank and the limit must be greater than zero.
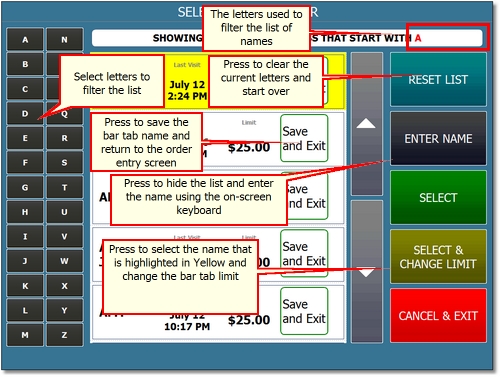
New Bar Tab Screen
The preset bar tab limit appears on the LIMIT button. Press the LIMIT button to change the amount, if required. A name must be entered before pressing the green CONTINUE button to start the new tab.
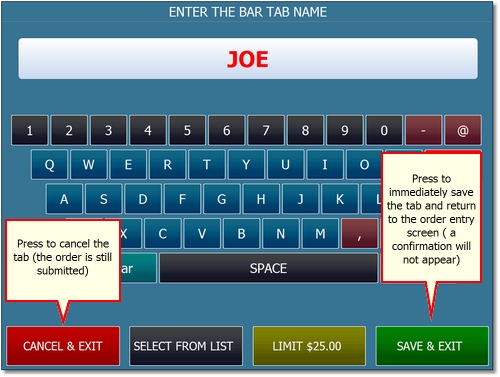
Enter the Bar Tab Name
To start a new bar tab using the customer's credit card, press the Pre Authorize button. The credit card screen will appear. Confirm that the preset limit is correct, press the Pre Authorize button and swipe the customer's card. If the transaction is successful, the new bar tab will be created using the name on the card and no further action is required.
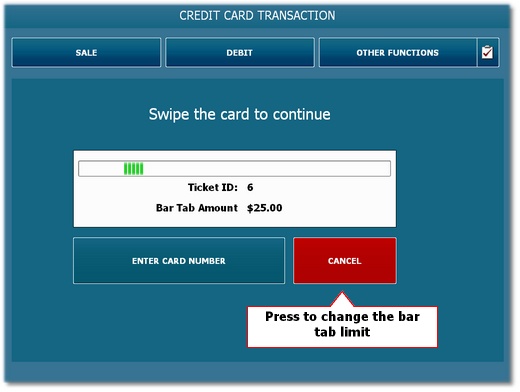
Preauthorizing a new bar tab
If you wish to increase the preauthorized limit on the bar tab, press the Cancel button followed by the green Amount To Charge button and enter the new amount using the on-screen numeric keypad BEFORE swiping the customer's card. The press the PREAUTHORIZE button and swipe the card.
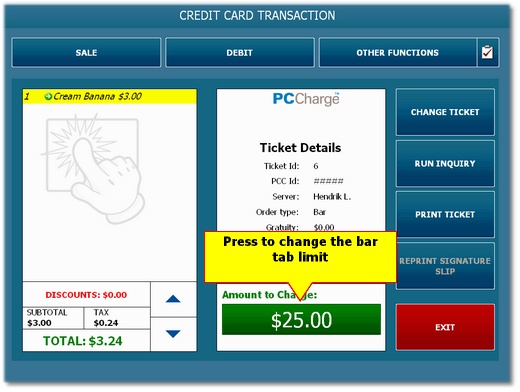
Changing the bar tab limit before preauthorization
The preset limit will prevent the server from entering a new item on the order if the item will cause the order total to exceed the limit. This limit can be disabled for name only bar tabs, but must be enforced for pre authorized bar tabs, since the payment processor only guarantees the pre-authorized amount. If the preset limit has been reached, the order should be settled and a new tab started.
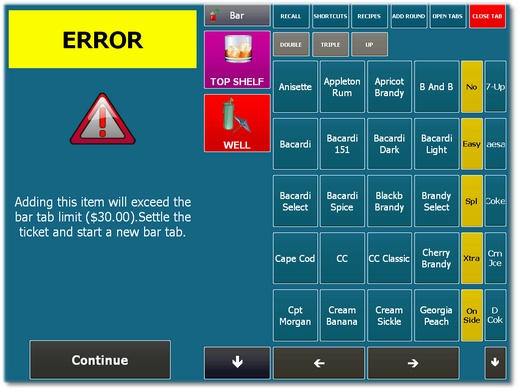
Alert informing the server that the bar tab limit cannot be exceeded
When the customer is ready to settle the bar tab, reopen the order on the order entry screen by pressing the OPEN TABS button.
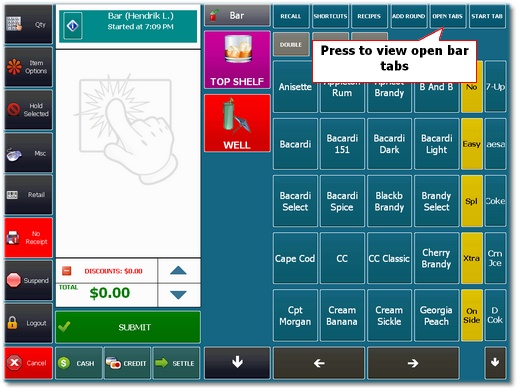
Closing an existing bar tab
Press the Close Tab button to continue.
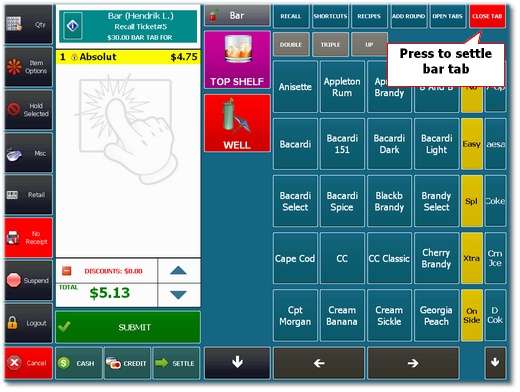
Closing an existing bar tab
Press the Print Signature Slip button. at this point the customer will enter the gratuity amount and sign the slip. This transaction must then be post-authorized (captured) by pressing the Gratuity button on the start screen. The order will remain open until the gratuity is added.
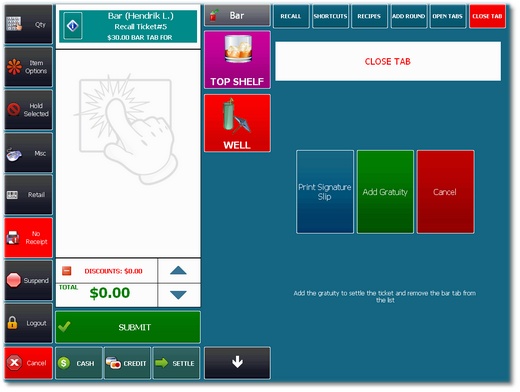
Printing a Signature Slip
Important Notes:
| • | External credit card machine users should use the first method to start a new bar tab. Pre-authorized bar tabs are available only when integrated credit card processing is used. |
| • | The credit card processing type must be set up as Pre Authorize / Capture, not Sale/Add Gratuity. Credit card processing is configured in Back Office > Configuration > Main Settings by clicking the Credit Cards tab. |
| • | Regardless of which method is used to start a new bar tab, the initial drink order is submitted immediately when the Enter Name Only or Pre Authorize button is pressed. Cancelling the new bar tab after this point will not cancel the initial drink order. |
| • | Bar tabs are generally used for orders that will be settled the same business day. For long-term bar tabs, it is preferable to use Customer Accounts. |
| • | Bar tabs can be started for any order type, but the bar tab functions are accessible only through the Bar menu. |
Page url: http://www.amigopos.com/help/html/index.html?bar_tabs.htm