Navigation: Credit Cards > PCCharge Payment Server >
PCCharge Payment Server Reports


|
Navigation: Credit Cards > PCCharge Payment Server > PCCharge Payment Server Reports |
|
Amigo Pos has the ability to generate a limited number of reports directly from PCCharge Payment Server. The same reports are available from within the PCCharge Payment Server user interface. As of this writing, the following PCCharge Payment Server reports are available in Amigo Pos Back Office:
| • | Credit Card Detail Report |
| • | Batch Pre-Settle Report |
| • | Batch Post-Settle Report |
Back Office > Summary

PCCharge Payment Server
Open Back Office and click the PCCharge Reports button under the summary tab. Note that the button is not visible until PCCharge Payment Server is selected as the processing method and the application is restarted, as described in the previous topic. The following settings are available:
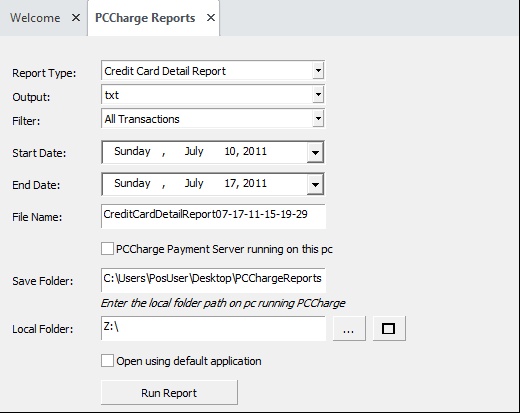
PCCharge Reports Settings
| • | Report Type: Amigo Pos is capable of displaying the Credit Card Detail Report, Batch Pre-Settle Report and Batch Post-Settle Report |
| • | Output: - PCCharge Report Printer (a report printer must be set up in PCCharge Payment Server to use this method) - PDF file (verify that Adobe Acrobat reader is installed on the pc) - RTF file - TXT file |
| • | Filter: The filter is applied to the Credit Card Detail Report. Select All, Approved or Declined transactions |
| • | Start Date: Select the starting date for the report. This value is not used by the Batch Pre-Settle Report. |
| • | End Date: Select the ending date for the report. This value is not used by the Batch Pre-Settle Report. |
| • | File Name: Verify that a unique file name is entered before running the report. An error will result if the file already exists |
| • | PCCharge Payment Server running locally: Check the box if PCCharge Payment Server is installed on the local pc. |
| • | Save Folder: Enter the path to the shared folder that will contain the reports. This path is relative to the pc running PCCharge Payment Server. If PCCharge Payment Server is running on a different machine, carefully enter the path using the keyboard as it appears on the pc running PCCharge Payment Server. If PCCharge Payment Server is running locally, use the folder select button to select the folder from the list. The folder must be writeable by PCCharge Payment Server and readable by Amigo Pos. *Important: Amigo Pos can verify that the Save Folder path is valid only if PCCharge Payment Server is installed on the same pc used to run the report. Using an invalid path may cause PCCharge Payment Server to display an prompt and generate the User In Use error for subsequent report requests or transactions. If this occurs, restart PCCharge Payment Server, verify that the folder name is correct and try running the report again. |
| • | Local Folder: Select the mapped network drive as described below |
| • | Open using default application: Check the box to open the file using the default Windows application, i.e. Adobe Acrobat, Wordpad or Notepad. Uncheck the box to open the report in Amigo Pos. Note that this setting has not effect if the output is set to PCCharge Report Printer. In addition, rtf files are always opened using the Windows application. |
If PCCharge Payment Server is running on a different pc than the pc used to generate reports from Amigo Pos, complete the following steps:
Step 1: On the PC running PCharge Payment Server:
| • | Create a new folder, i.e. C:\Documents and Settings\PosUser\Desktop\PCChargeReports on Windows XP or C:\Users\PosUser\Desktop\PCChargeReports on Windows Vista/7. |
| • | Right-click on the new folder and share the folder so that it is visible on the network. Refer to the Share Folder help topic for addition information. |
Step 2: On the pc running Amigo Pos that will be used to generate the reports:
| • | Map a network drive to the folder shared on the pc running PCCharge Payment Server |
| • | Enter the entire path as shown above in the Save Folder box, i.e. C:\Documents and Settings\PosUser\Desktop\PCChargeReports on Windows XP or C:\Users\PosUser\Desktop\PCChargeReports on Windows Vista/7. |
| • | Select the mapped network drive in the Mapped Drive box |
Page url: http://www.amigopos.com/help/html/index.html?pccharge_reports.htm