Navigation: Credit Cards > PCCharge Payment Server >
PCCharge Auto-Settle Utility


|
Navigation: Credit Cards > PCCharge Payment Server > PCCharge Auto-Settle Utility |
|
PCCharge Payment Server Auto-Settle Utility
PC Charge includes a utility that allows you to have your pos station-based credit card merchant account settle automatically. Previously, PCCharge required that you manually settle your pos station-based account's batch. The new PCCharge Auto-Settle utility allows you to have your batch close automatically at a specified time--just like a host-based account's batch (if set to auto close).
If your account is host based this topic can be disregarded.
Technical Details: The PCCharge Auto-Settle utility will create a log of settlements in plain-text format and store it in the PCCharge installation directory. The file (named Settle.log) will contain the settlement response from the processor and the time/date of the settlement.
Note: The Auto-Settle utility is primarily intended for use with one account. When used with multiple accounts, PCCharge will attempt to settle the batches in the order that their respective accounts appear in the software. If a settlement attempt fails, the Auto-Settle utility will not continue on to the next account. We HIGHLY recommend that you check your Settled Batch Report after using the utility with multiple accounts.
Installing and Using the Auto-Settle Utility
| 1. | Since the PCCharge Auto-Settle utility is a powerful tool, it's not included in the standard PCCharge installation. |
| 2. | To install the utility, double-click the file Setup.exe found within the AUTOSETTLE directory on the PCCharge installation CD. Follow the on-screen installation instructions to install the Auto-Settle utility. |
| 3. | The PCCharge Auto-Settle utility can be used on the computer on which PCCharge is located, or a computer with read/write access (full permissions) to the PCCharge installation directory. |
| 4. | Start PCCharge. PCCharge MUST be running while you're using the Auto-Settle Utility. |
| 5. | Click the Credit icon to bring up the Credit Card Transaction window. This window must be open in PCCharge in order to use the Auto-Settle utility. |
| 6. | To use the Auto-Settle utility, browse to the directory where it was installed (using Windows Explorer). Double-click the file AutoBatch.exe. |
Note: It may be convenient to create a shortcut to this file on your desktop. Consult your Windows help file for instructions on creating a shortcut (instructions vary among the versions of Windows).
7. On your first execution of the program, you'll be prompted to specify the location of the PCCharge directory.
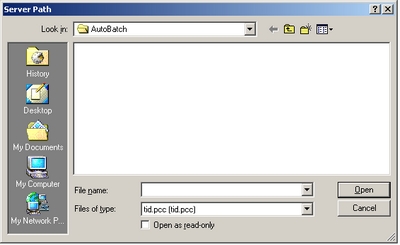
Select the tid.pcc file located in the PCCharge Payment Server installation directory.
8. Browse to the directory of your PCCharge executable.
9. Select the file named tid.pcc. Click the Open button. The Auto-Settle main window will appear.
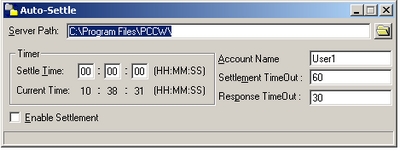
Enter the time to automatically settle the batch daily
10. The Server Path is the directory path of the PCCharge executable. Should it ever become necessary to modify this path, you may enter the new path manually or use the folder button to the right of this field.
11. Enter the desired Settle Time (in military format Ex. 15:00:00 = 3:00:00 p.m.). The Auto-Settle utility will instruct PCCharge to attempt to settle the batch.
12. Select the Enable Settlement option to enable automatic settlement of your batch. As a safety precaution, the Auto-Settle utility is not enabled when it starts. To make it so that settlement is enabled every time this utility starts, you'll need to edit the program shortcut's properties.
Important: If you want settlement to be enabled every time this utility starts:
| 1. | Right-click on the program's shortcut. |
| 2. | Left-click Properties. |
| 3. | Add /e to the end of the address shown in the Target. |
Example: "C:\Program Files\AutoBatch\AutoBatch.exe" /e
Click OK. The shortcut will now cause the utility to start with settlement enabled.
13. Enter the Account Name that PCCharge will use to settle your batch. This field refers to an active PCCharge user. If you have multiple users registered in PCCharge, you may select one of those to use instead of User1. Otherwise, leave this field at the default value.
14. Use the Settlement TimeOut field to specify the number of seconds that the PCCharge Auto-Settle utility will wait for a batch to settle before displaying an error message. You will very likely need to adjust this value to accommodate:
| 1. | the size of your batch |
| 2. | the average settlement speed of your processor |
| 3. | whether you're using a TCP/IP or dial-up connection |
The exact time needed will have to be determined through trial and error. It's suggested that you time a normal "manually" settled batch before entering a value into this field.
15. Use the Response TimeOut field to specify the number of seconds that the PCCharge Auto-Settle utility will wait for any response from PCCharge. This response comes before actual settlement is attempted, and can be thought of as the initial "handshake" response. Most users should leave this field at the default value.
16. The Auto-Settle Utility is now set up. Leave it and PCCharge running, and your batch will be automatically settled at the specified Settle Time.
Important: Add a shortcut to the Windows startup folder so that the Auto-Settle utility starts when Windows starts.
Page url: http://www.amigopos.com/help/html/index.html?pccharge_auto_settle_utility.htm