Navigation: Web Orders >
Web Orders Settings


|
Navigation: Web Orders > Web Orders Settings |
|
Amigo Pos includes the option to receive orders from a browser-based ordering system. Visit http://www.yummytakeout.com to obtain a free 30-day trial and return to this help topic to complete the setup procedure.
Prerequisites
| • | SQL Server Express: The web order service requires Amigo Pos to use MS SQL Server Express. Current MS Jet users must install SQL Server Express and migrate the existing database before continuing. |
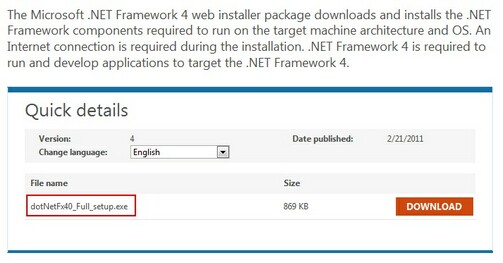
| • | Microsoft .Net Framework 4: The Amigo Pos version 7.15 and earlier installer includes Microsoft .Net Framework 4 Client Profile. The Amigo Pos 7.16 and later installer includes Microsoft .Net Framework 4 Full Installation. The web order interface requires the Microsoft .Net Framework 4 Full Installation, which can be installed over the existing Microsoft .Net Framework 4 Client Profile installation. If the original Amigo Pos installation was version 7.15 or earlier, click the link to download and install .Net Framework 4 at any pos station or back office workstation that will connect to the web service to receive orders or update the menu. |
Settings
Only local settings (per pos station) are described below. Log in to your web site to edit site settings. After installing MS SQL Server Express and testing the database connection, restart back office and navigate to Configuration > Web Orders. This link is visible only when using MS SQL Server (not MS Jet).

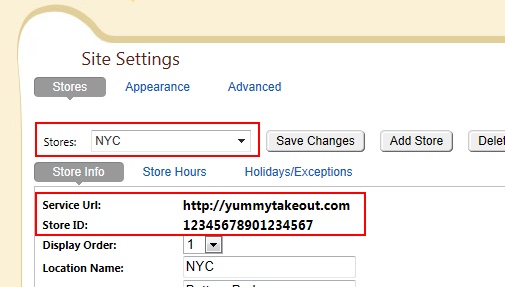
Login to your store's web site and click the Settings link at the top. The login id and password is the same for all stores. A unique Store Id is assigned to each store.
The settings in the Web Service Credentials group are used to connect to the web service and authenticate the local workstation. The settings in the Order Settings group are used to specify whether to enable web orders at the local pos station. Restart Amigo Pos after changing the settings.
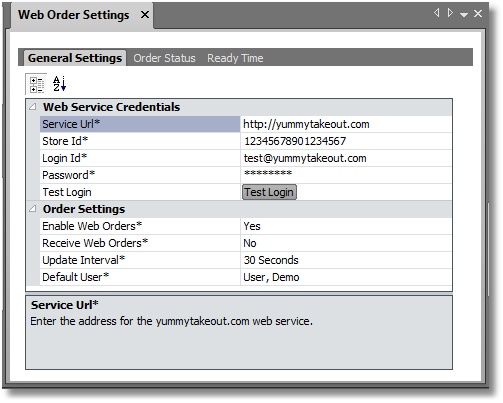
Web Service Credentials
Service Url: The internet address of the yummytakeout.com web service is visible on the Store Settings page at your store's web site. Copy/paste the url into the box. Do not use the value shown below as it may be different for your store's web site.
Store Id: The store id is different for each store. Select the store from the drop-down list and copy/paste the Store ID into the box. Note that each store location has a unique Store Id and the correct Store Id must be entered so that the local pos station receives orders intended only for this store.
Login Id: The email used to login to your store at yummytakeout.com
Password: The password used to login to your store at yummytakeout.com
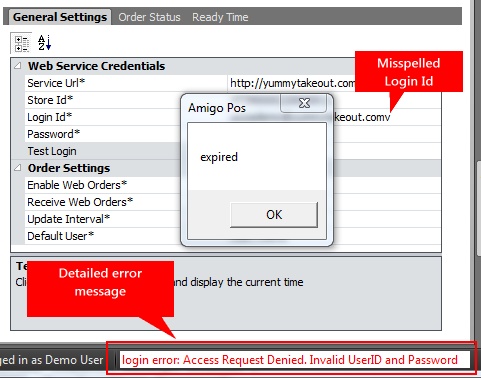
Test Login: Click this button to connect to the web service and retrieve the current UTC time. The back office status bar will display an login errors. An unsuccessful test will result in an "expired" message and a successful attempt is similar to the second image below.

Successful Web Service Login
Incorrect Login Id Results in Error
General Settings
Enable Web Orders: Select Yes to enable the Web Orders button on the main screen and the back office Update Web Site Button. This setting must also be enabled to use the Receive Web Orders Setting below and to enable the Update Web Site and Web Orders buttons shown in the image. This is local to each pos station.
Receive Web Orders: Select Yes to receive web orders at the pos station. This setting should be enabled at one pos station only, preferable the same pos station that is running MS SQL Server.
Update Interval: Select the update interval in seconds to check for new orders. Stores with slow internet connections should use a longer interval. Stores with broadband connections should use the default (30 seconds) to allow enough time to save new orders before polling begins again. Restart Amigo Pos after changing this setting.
Default User: Each new order requires a server so that it can be saved to the database. The default user is used to save new orders to the database. You may wish to create a new employee to use exclusively when saving web orders to avoid issues where employees are required to settle all orders when clocking-out or when the employee banking end shift is run.
Delivery Zone: Select the delivery zone to use when saving Delivery orders in Amigo Pos. This zone should be specifically for web orders with the delivery charge set to the same amount as the web site delivery charge. This value is required so that orders can be recalled in-store and automatically charge the same amount for delivery when the order is submitted.
Store Pickup Zone: Select the delivery zone to use when saving Store Pickup orders in Amigo Pos. The delivery charge for this zone should be set to zero. This value is required so that orders can be recalled in-store and not add the automatic delivery charge when the order is submitted.
Show Alert: Select Yes to show a screen prompt at this pos station when a new web order arrives.
Play Sound: Select Yes to sound a tone at this pos station when a new web order arrives.
Sound: Select the sound to play when an order arrives. Verify that the sound will playing by clicking the Play Sound button because not all .wav files are supported.
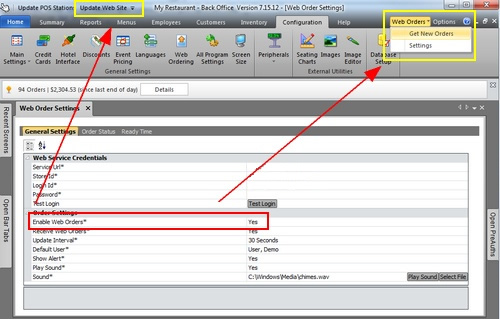
Enable Web Orders set to Yes
Page url: http://www.amigopos.com/help/html/index.html?web_order_settings.htm