Navigation: »No topics above this level«
Server Banking


|
Navigation: »No topics above this level« Server Banking |
|
Amigo Pos 7 includes an employee banking module for use when servers hold cash until the end of shift. Server banking can be used in combination with normal cash transactions. Available options include the ability to accept server deposits throughout the shift and the ability to deduct non-cash gratuities from the server's total liabilities.
Server banking configuration and usage is described below:
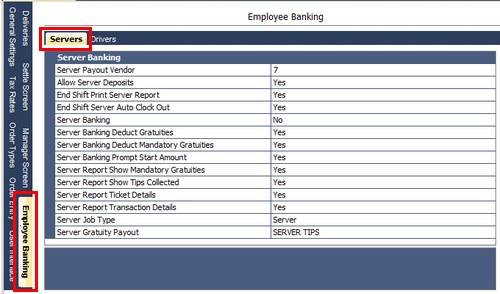
Server banking is configured in Back Office > Configuration > Main Settings > Employee Banking. Settings are shared between all pos stations.

Back Office > Configuration > Main Settings
The available options are:
| • | Allow Server Deposits: Set to Yes to accept server deposits on the manager screen |
| • | End Shift Print Server Report: Set to Yes to automatically print the server liability report when the end shift is run |
| • | End Shift Server Auto Clock Out: Set to Yes to automatically clock-out the server when the end shift is run. Set to No if the server is required to enter cash gratuities at clock-out |
| • | Server Banking: Set to Yes to enable server banking |
| • | Server Banking Deduct Gratuities: When using server banking, deduct non-cash gratuities from server liabilities |
| • | Server Banking Deduct Mandatory Gratuities: When using server banking, deduct mandatory gratuities from server liabilities |
| • | Server Banking Prompt Start Amount: If server banking is enabled, setting this value to Yes will prompt the user to enter the bank start amount and source of funds when starting a shift |
| • | Server Report Show Mandatory Gratuities: Set to Yes to itemize the sum of themandatory gratuities collected by each driver on the server liability report |
| • | Server Report Show Tips Collected: Set to Yes to itemize the sum of the tips collected by each server on the server liability report |
| • | Server Report order Details: Set to Yes to itemize each order on the server liability report |
| • | Server Report Transaction Details: Set to Yes to itemize the sum of transactions for each payment type on the server liability report. Set to No to show the cash total only |
| • | Server Job Type: Select the permission name that corresponds with the server job type. Set this value to zero to show all users with orders for the current business day (not recommended when both server banking and driver banking are enabled). |
| • | Server Gratuity Payout: Select the cash paid out reason to use for server gratuity disbursements |
Server Banking Configuration
In addition, the CASH BANK payment type can be set to Enabled in Back Office > Configuration > Main Settings >Settle Screen to allow the server to check in a order so that it is no longer on the active orders list and the seating chart displays the table as available. Note that the order of the payment type buttons can be customized so that the CASH BANK button appears at the top of the list. The Allow Settle permission must be set to Yes for the server job type (the Allow Cash permission can be set to No).
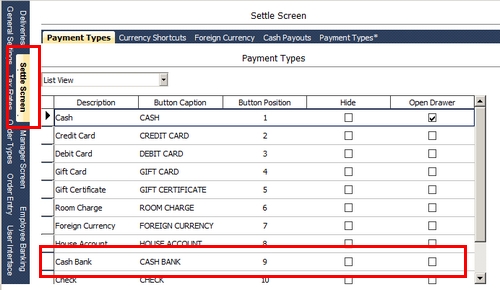
Cash Bank Payment Type
Note: Only users with the Server job type are shown on the Add Server Deposit screen. If permissions have been changed from change the value for Server Server Job Type so that the correct job type appears on the drop-down list. The job type name may be different than the value shown below if new job types were defined.
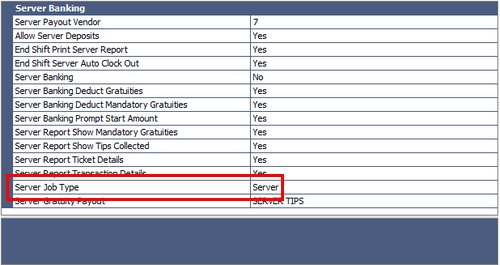 Back Office > Main Settings > Employee Banking
Set this value to zero to show all employees with orders for the current business day (not recommended when both server banking and driver banking are enabled).
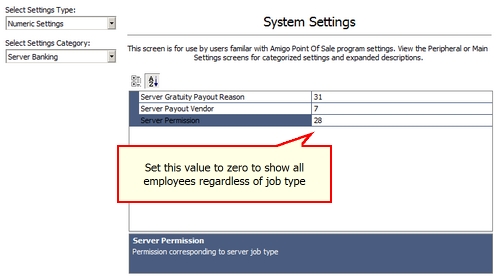 Back Office > Configuration > All Program Settings
The value of any permission id is available by opening any employee in the user editor and referring to the number in parentheses next to the permission name. For example, the permission id for servers in the evaluation version database is 28, as show below.
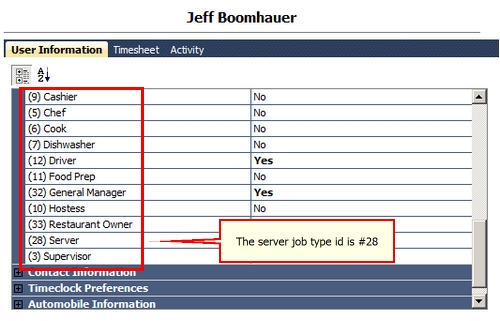 Employee Editor
|
When using server banking, orders paid with cash are generally not settled until the end of the shift. The order must be "checked-in" in order to remove the order from the recall list and reset the table status on the seating chart. When an order is checked-in, no transactions are recorded in the database and the order is still shown on the manager screen open orders list. To check-in an order, press the settle button, select the order and select the Cash Bank payment type.
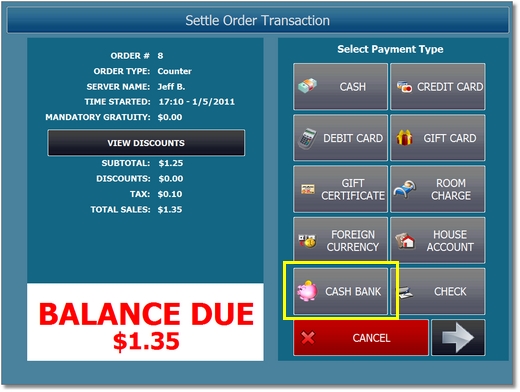
Settle Screen Cash Bank
The server may wish to make deposits throughout the shift. Only a user with permission to access the manager screen can accept server deposits. Press the Employee Banking button at the top of the manager screen and select Server Deposit/End Shift. A list of server deposits for the current business day is shown. Press the New Deposit/End Shift button and select the server. Enter the deposit amount and press Save Deposit.
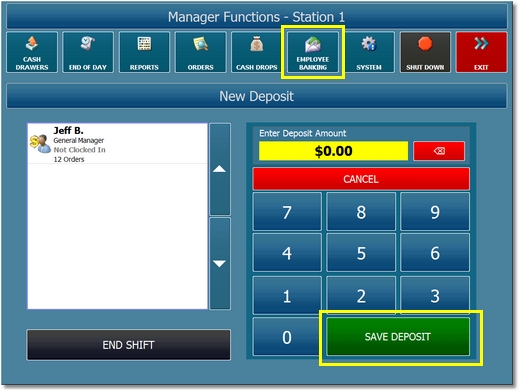
Server Deposit
Each server's cash liability is determined by summing all checked-in and settled orders and deducting the sum of all transactions previously applied to those orders, server deposits and optionally deducting non-cash gratuities such as credit card tips (if enabled as described above). When the server's shift is completed, a manager can accept cash from the server for the server's liabilities and settle the balance due on each of the server's open orders. Login as manager and press the Employee Banking button on the manager screen. Press the Server Deposit/End Shift button.
Manager Screen Employee Banking
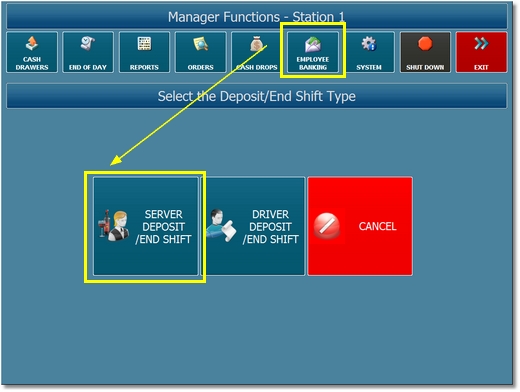
A list of server deposits for the current business day is shown. Press the New Deposit/End Shift button to continue.
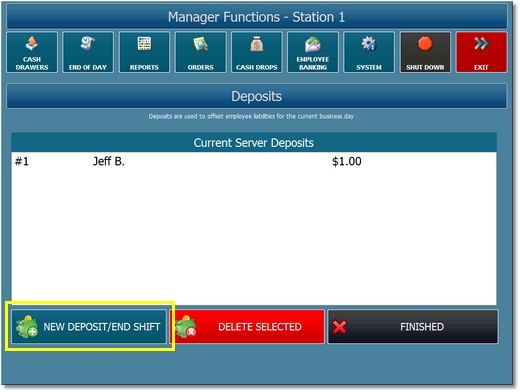
New Deposit/End Shift
Select the server and press the End Shift button.
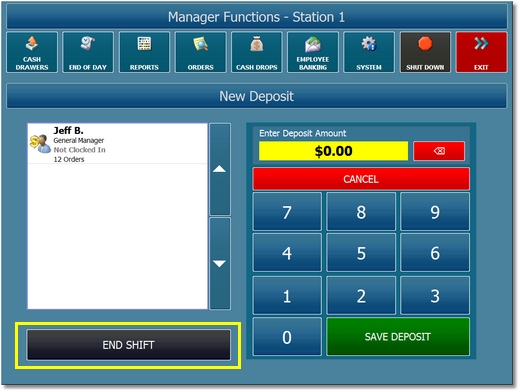
User Selection
The server liability report is shown and can be printed to the local receipt printer if required. When the server remits the total due, press the End Shift button to open the cash drawer. An individual cash transaction is entered for the balance due on each open order and each open order is subsequently settled. Note that this process may take a few seconds to complete if the server has many open orders.

End Shift Report & Confirmation
In order to offset the server's non-cash gratuities, if the non-cash gratuities total shown on the server bank report is greater than zero, a cash payout transaction is automatically recorded at the local pos station for the amount of the non-cash gratuities. The entry can be assigned a specific payout reason in the configuration settings shown above and will appear on the cash drawer report immediately after the server end shift is completed.
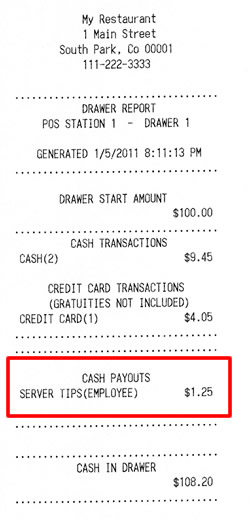
Cash Drawer Report
The server may obtain the liability report (identical to the report shown above) on the time clock screen, even if the time clock feature is not in use or the server is not clocked in. If the server does not have appropriate permissions to access the time clock, the manager can view the server's liability report at any time during the business day by logging in and navigating to Manager > Employee Banking > Server Deposit/End Shift.
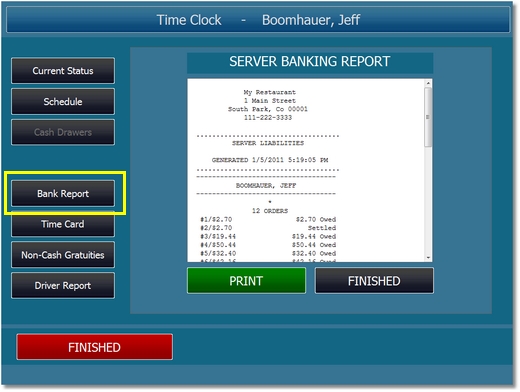
Time Clock Server Bank Report
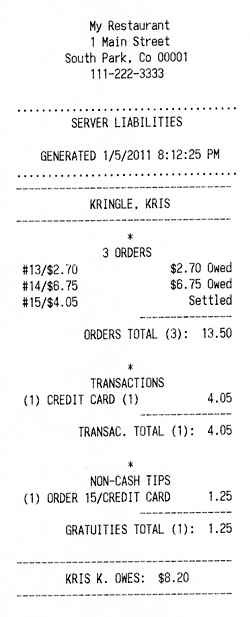
Server Bank Report
Page url: http://www.amigopos.com/help/html/index.html?server_banking.htm