Navigation: Database > MS Jet Database Management >
Database Backup & Restore


|
Navigation: Database > MS Jet Database Management > Database Backup & Restore |
|
This topic applies only to systems using the default Microsoft Jet database. Refer to this article when using the MS SQL Server database engine.
Introduction
The database can be backed up automatically so that a recent backup exists in case of hardware failure. In most cases, it is advisable to use a removable USB flash drive to act as the destination for the backup. If a hardware failure occurs, the database can be moved to another pos station so that the most recent database backup can be made active.
Configuration
The database can be backup up automatically by choosing 1 of 4 methods:
| 1. | Specified Interval: Each time the user logs in (Front of Customer only), the database will be backup up if the last backup occurred earlier than the specified interval. The interval can range from 1 hour to 1 week. |
| 2. | Drawer Reset: The database will be backed up each time the drawer is reset |
| 3. | Program Startup: The database will be backed up each time the Front of Customer is started (it will not be backed up when Back Office is started) |
| 4. | *End of Day: The database will be backed up each time the End of Day is run |
*Recommended
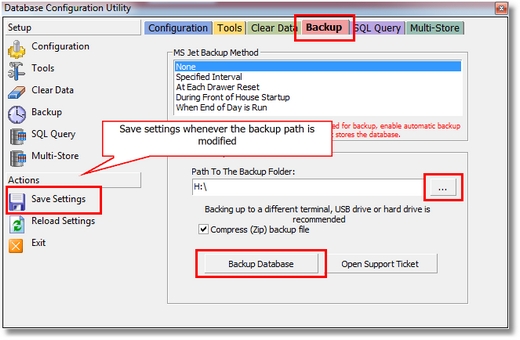
MS Jet Database Backup Configuration
Backup Path
A suitable backup path should be chosen so that network traffic is minimized on busy systems. Generally, the backup should be configured to run only on the pos station that stores the database. If a network path is used as the destination folder, the database should be backed up less frequently, i.e. when the End of Day is run. Larger databases require additional time to back up, network bandwidth will be used during the entire backup process. Depending on the size of the database and the destination folder, the backup may take from 5 seconds to 1 minute or more.
If a USB flash drive is the destination, check the box to automatically compress the database when the backup is run. This will save considerable space on the USB drive, since previous backups are not automatically deleted. When restoring the database, the backup must be uncompressed before it can be used.
Manual Backup
Specify the path to the backup folder and press the Save Settings button. Press the Backup Database button. A prompt will appear specifying the location of the new database backup. The backup file is compressed (zipped) and named posbackup_MM-DD-YY_hhmmap.zip, where MM is the month, day, year and time that the backup was created. This file can be attached to a support ticket or email. If the file is very large, use a free file sharing service and send the link to support staff.
Manual Backup to Desktop
Locate the Amigo Pos shortcuts folder on the desktop or Windows start menu. Double-click on the shortcut named Database Backup (Desktop) to create a compressed backup on the desktop. The backup file is compressed (zipped) and named posbackup_MM-DD-YY_hhmmap.zip, where MM is the month, day, year and time that the backup was created. This file can be attached to a support ticket or email. If the file is very large, use a free file sharing service and send the link to support staff.
Restoration
To begin using a backup database, copy the most recent backup to a shared and writeable folder on the pos station that will store the database. If the database is compressed (zipped), uncompress the backup by double-clicking on the file so that the archive is opened by the Windows XP uncompress utility (zipfldr.dll). Then drag the file to the shared database folder. Ensure that the file is writeable by right-clicking on the file and selecting Properties from the context menu. Uncheck the box next to Read-Only if it is checked and click the Apply button. Start Amigo Pos so that the database error screen appears. When prompted to select the database path, navigate to the shared database folder and select the backup file, which ends with the .mdb extension. Click Save Settings on the right menu bar and then click Restart to begin using the new database.
On multi-pos station systems, first map a network drive to the new database folder and then start Amigo Pos so that the database error screen appears and specify the path to the database using the new network drive. Repeat on all pos station except the pos station that stores the database.
Page url: http://www.amigopos.com/help/html/index.html?automatic_backup.htm