Navigation: Program Settings > Main Settings >
Order Entry Options


|
Navigation: Program Settings > Main Settings > Order Entry Options |
|
Order entry preferences determine the appearance and behavior of many order entry screen buttons. Most settings are shared by all pos stations on the network; settings marked with an asterisk must be configured on each pos station independently.

Back Office > Configuration > Main Settings
The Order Entry Screen tab in Back Office > Configuration > Main SettingsOrder Entry contains the following settings:
| • | Default beverage category: Define the category used when the server is forced to select a beverage for each guest |
| • | Display menu items alphabetically: Check the box to order menu items alphabetically instead of by button position |
| • | Display modifiers only when mandatory groups exist: Suppress the modifiers screen if the item contains only non-mandatory modifiers. An item's modifiers can be recalled later by highlighting the item on the screen ticket |
| • | When CASH or CREDIT CARD button is pressed: Select the time to print the customer receipt when pressing the pay now button |
| • | Assume exact change when cash button is pressed: If exact change is assumed when pressing the CASH button, the user is not prompted to enter the amount tendered and the drawer is opened immediately. This feature is useful for bartenders. |
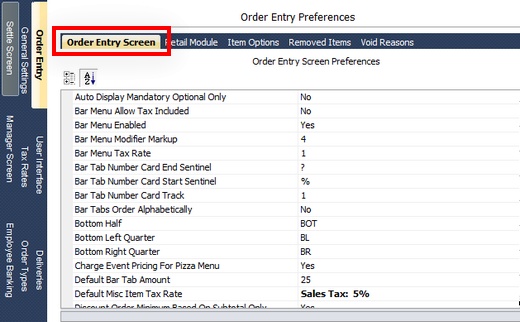
Order Entry Screen Preferences
The Bar Menu Settings category holds the following settings:
| • | Pos Station is located at the bar: If the pos station is located at the bar, prep tickets are suppressed for bar menu items entered at the pos station. |
| • | Hide Cash Tender button (2): Check box to hide the cash button, which allows the user to instantly submit the order, open the cash drawer and clear the screen order. This feature performs the same function as the CASH button at the bottom of the order entry screen and requires the 'Assume exact change when cash button is pressed' option to be enabled (as shown above) or the user is prompted to enter the cash amount tendered. |
| • | Hide Shortcuts button (3): Check box to hide the shortcuts button, which displays a list of frequently used drinks |
| • | Hide Recall button (5): Check box to hide the recall button, which displays a list of all currently active orders |
| • | Hide Add Round button (4): Check box to hide the add round button, which allows the user to double the (initial) quantity of any previously entered drink order. For example, if a recalled order contains 2 draft beers, 1 mixed drink and3 shots, pressing the recall button will increase the quantities to 4, 2 and 6. Pressing the Add Round button a second time will increase the quantities to 6, 3 and 9. The add round button affects only previously entered bar menu items (previously entered items appear in red text). |
| • | Hide Drink Recipes button (8): Check box to hide the Drink Recipes button |
| • | When starting a new bar tab, prompt the server to select a seat: The user can be forced to select the customer's seat when starting a new bar tab |
| • | Order Bar Menu items alphabetically: Check the box to order bar menu items alphabetically instead of by button position |
| • | Show Bar Tab button (6 + 7): Shoe the bar tab button on the order entry screen |
| • | Show Bar Tab Pre-authorize button: Show the pre-authorize button to allow bar tab to be created by swiping the customer card (for PCCharge Payment Server users only). View the bar tabs help topic for additional details. |
| • | Enforce Bar Tab limit: If the bar tab limit is enforced, the user will not be allowed to add items to a bar tab if the limit will be exceeded. This feature is useful when pre-authorized bar tabs are used. |
| • | Default Bar Tab limit: Used in conjunction with the previous setting, enter a numeric value that determines the default bar tab limit. This value can be changed when the bar tab is started. |
| • | Order Bar Tabs alphabetically: Check box to order bar tabs alphabetically instead of order number (time entered) |

Bar Menu Settings
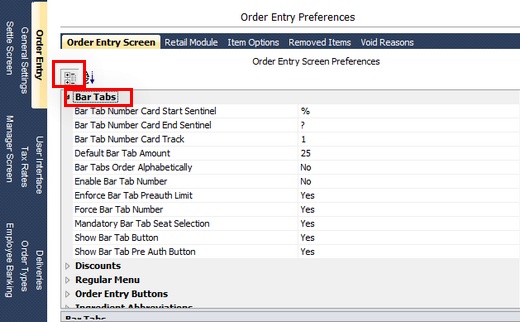
Bar Tab Settings
The Print Order By Default setting specifies the default position of the print order button on the order entry screen. Refer to the customer receipt printing topic for additional print options.
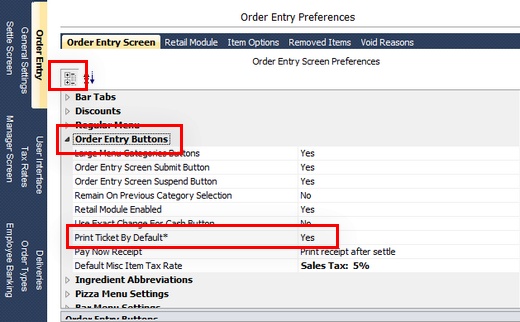
Order Entry Screen Printing Preferences
The Item Options tab in Back Office > Configuration > Main SettingsOrder Entry contains contains the list of items that appears when the ITEM OPTIONS button is pressed on the order entry screen. Item options apply to an individual order item and appear indented on the order, similar to a optional.
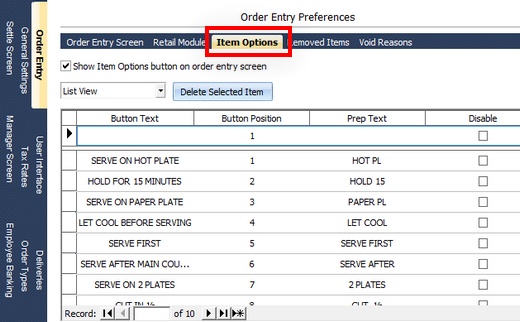
Item Options
The Removed Items tab in Back Office > Configuration > Main SettingsOrder Entry contains the list of items that appears when an item is removed from an existing order on the order entry screen. The user is prompted to select the reason for the item removal only if the item has been previously submitted. Previously submitted items appear in RED text.
A deleted item alert can be sent to remote printers whenever an order item is removed. Check the box next to Send message to remote printers and or kitchen display after removing order items to enable this feature.
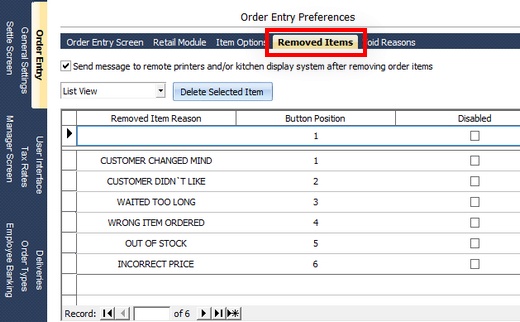
Removed Order Items Reasons
The Void Reasons tab in Back Office > Configuration > Main SettingsOrder Entry contains the list of items that appears when an order is voided. The user is prompted to select the reason for the void and the reason is recorded in the back office orders log.
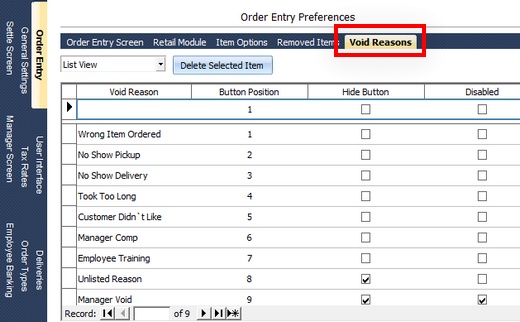
Order Void Reasons
Page url: http://www.amigopos.com/help/html/index.html?order_entry_options.htm