Navigation: Credit Cards > PCCharge Payment Server >
PCCharge Payment Server Configuration


|
Navigation: Credit Cards > PCCharge Payment Server > PCCharge Payment Server Configuration |
|
PC Charge Payment Server Configuration & Usage
Amigo Pos 7 includes built-in integration for restaurant and retail transactions using Verifone Verifone PCCharge™ Payment Server v5.10 (current part# 100PROL2000-SUPP ). PCCharge Payment Server requires additional initial setup, such as the creation of a cashier named MANAGER and a mandatory password of sufficient strength. PCCharge Pro is not supported.
Note: Do not attempt to process transactions or run reports directly from the PCCharge Payment Server GUI while Amigo Pos is processing transactions (in the front of house or back office). If you wish to process transactions or run reports directly with PCCharge Payment Server (instead of through Amigo Pos), it is highly recommended that you use the PCCharge Client. The PCCharge Client is included on the PCCharge Payment Server CD, and can be installed on the same (or on a different) computer as PCCharge Payment Server. The PCCharge Client has payment processing and reporting capabilities. |
PCCharge Payment Server must be obtained separately and is available from many sources including most merchant account providers, who often provide it at reduced or no cost. In addition to supplying PCCharge Payment Server, many merchant account providers will log in remotely, install and configure PCCharge Payment Server, in which case the following steps will have already been performed.
PCCharge Payment Server™ Version Information
Regardless of the number of pos stations, PCCharge Payment Server is installed on one machine only. Other machines access PCCharge Payment Server using the local network. Each pos station requires a unique PCCharge User Id
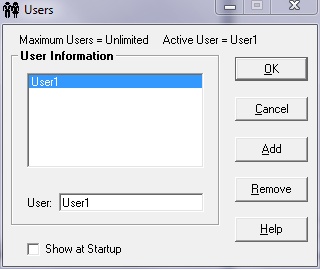
PCCharge Payment Server includes 1 User ID by default. An additional PCCharge Payment Server User ID (current part#100ADUS) must be obtained for each additional pos station on the network. Do not use the same User Id on multiple pos stations, as errors or data loss may result from one pos station overwriting another pos station's transactions. For example, if you run PCCharge Payment Server on pos station #1 and have 2 additional pos stations, PCCharge Payment Server requires 3 User IDs, i.e. User1, User2 and User3. Select Settings > Users to view the current users in PCCharge Payment Server, as shown below.
Note: many merchant account providers will set up PCCharge Payment Server for you remotely or provide you with a setup file. If your merchant account provider configures PCCharge Payment Server for you, most of the steps below can be skipped, the TCP/IP settings should be confirmed, as described below.
PCCharge Payment Server™ with 1 User license installed
Introduction
PCCharge Payment Server should be installed on a single PC only. You may install PCCharge Payment Server on any machine on your network, regardless of whether Amigo Pos is installed on the machine. Most users elect to install PCCharge Payment Server on the same PC as the database server, since the PC must be running for Amigo Pos to run.
TCP/IP (installed by default with MS Windows XP and Vista) is used as the standard networking protocol. Ensure that your network is operational before attempting the following configuration. A separate User ID must be purchased for each additional pos station that needs to process credit cards (the first User ID is included with your purchase of PCCharge Payment Server.
Important: In order to ensure that PCCharge Payment Server starts automatically when Windows starts, add a shortcut to the MS Windows Startup folder.
Remember that PCCharge Payment Server runs in the background and requires no user interaction. However, you can open the graphical user interface at any time by double-clicking on the PCCharge Payment Server icon located next to the clock on the taskbar.
PCCharge Taskbar Icon
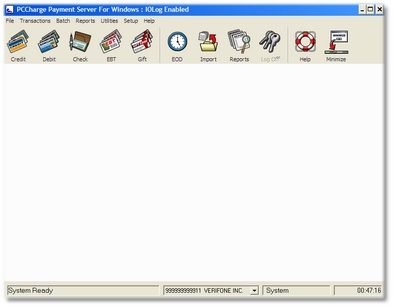
PCCharge Payment Server GUI
Begin by opening the Setup Wizard located under Setup > Merchant Setup on the menu.
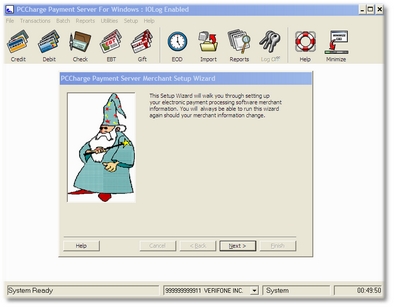
The Merchant Setup Wizard
Click Next to continue.
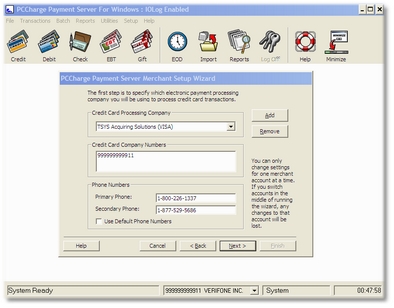
Processing Company Information
Select your credit card processing company from the drop-down list. The primary and secondary phone number fields will be filled in automatically by the setup utility. Do not edit these numbers unless you have been instructed to do so by your bank or credit card processing company. Click Next to continue.
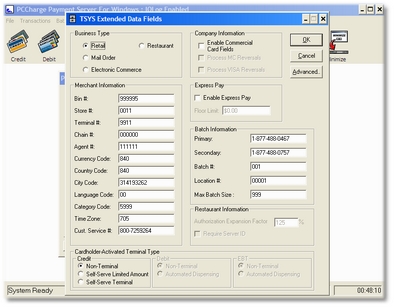
Extended Data Fields
Select Restaurant as the business type. Most fields can be left unchanged. Click the Advanced button.
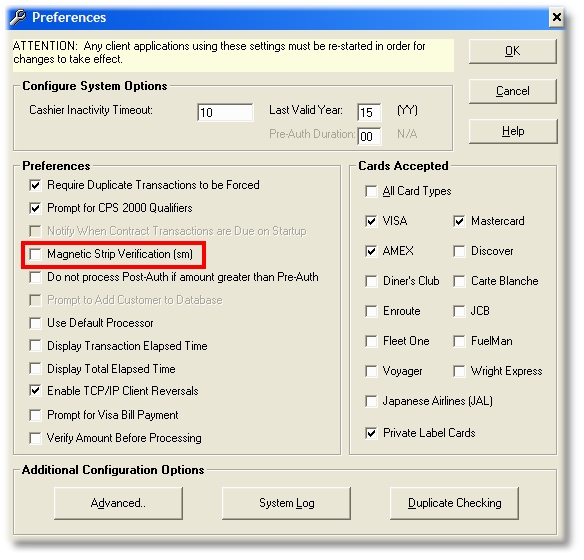
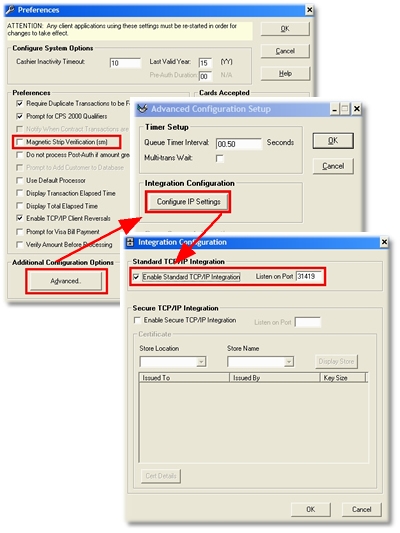
Disable Magnetic Stripe Verification
Uncheck the box next to Magnetic Stripe Verification (sm). If this step is not performed, the Encryption Error message may appear for swiped transactions.
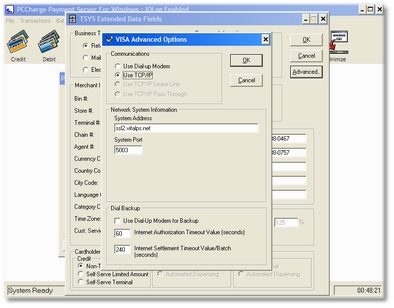
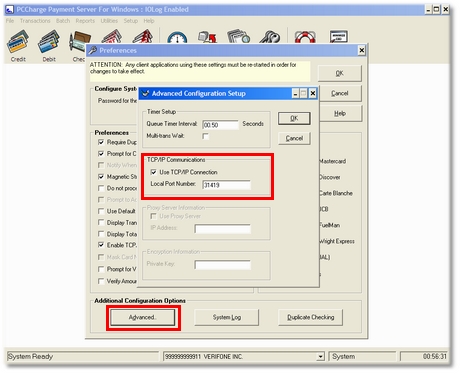
Networking & Modem Options
Select Use TCP/IP as the default communications type. The system address and system port should be automatically filled in. If not, contact your bank or payment processor for the server name and port number.
If the computer on which PCCharge Payment Server is running has a modem (connected to a phone line) attached, click the checkbox next to Use Dial-Up Modem for Backup. If PCCharge Payment Server cannot connect to the internet, your modem will be used to dial the credit card processor each time an authorization is required.
The internet authorization timeout value can be left at 60 seconds. This value is overridden by the value that you will specify in Amigo Pos back office. The Internet Settlement Timeout Value/Batch can be left at the default value. This value only has significance if you do not use automatic batch closing. Click OK to close the Advanced Options window. Click OK again to close the Extended Data Fields window. Click Next to continue.
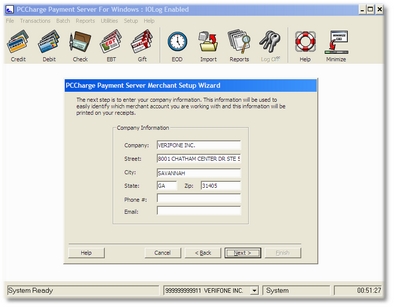
Company Information
Enter your company information and click Next to continue.
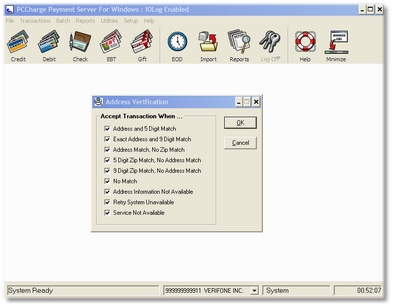
Transaction Defaults
AVS transaction fields are used to verify card information for telephone orders. Leave all fields checked unless you require address verification for credit card transactions. This type of verification is generally not required in a restaurant environment, since the card is physically present.
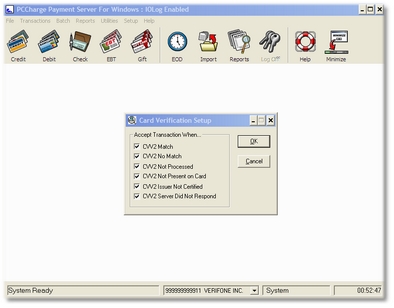
Verification Defaults
Card verification (CVV2) transaction fields are used to verify card information for telephone orders. Leave all fields checked unless you require CVV2 verification for credit card transactions. This type of verification is generally not required in a restaurant environment, since the card is physically present. Click Next to continue. Click Finish.
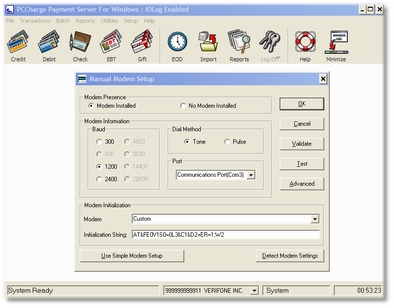
Advanced Modem Settings
If the pos station that has PCCharge Payment Server installed has a modem (connected to a phone line) attached, click Setup - Hardware Setup - Modem on the top menu. Ensure that your modem is configured correctly.
|
Enable TCP/IP Communications in PCCharge Payment Server |
|
Enable TCP/IP Communications in PCCharge Payment Server |
|
Batch Management |
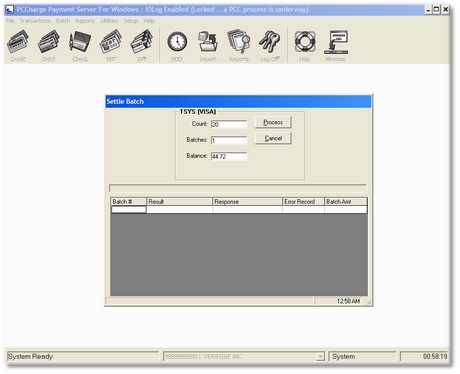
If you have setup manual batch processing with your credit card processor, click Batch - Settle... on the toolbar to settle your batch. Consult the PCCharge Payment Server User Manual for help on batch settlement and other features such as report generation. The PCCharge Auto-Settle utility is included on the PCCharge Payment Server installation disk. This application is installed separately and settles the batch daily. Additional information is available here.
PCCharge Payment Server prints reports to a full size printer and signature slips to a standard receipt printer. Navigate to Setup - Printer to configure each printer. Amigo Pos will print PCCharge Payment Server letter size reports to the report printer configured in PCCharge but PCCharge Payment Server is generally not used to print signature slips, unless credit card transactions are processed using the PCCharge Payment Server interface, bypassing Amigo Pos.
Page url: http://www.amigopos.com/help/html/index.html?pccharge_configuration222.htm