Navigation: Database >
Multiple Stores


|
Navigation: Database > Multiple Stores |
|
Thank you for using this beta feature. Please submit any issues or concerns via support ticket at http://amigopos.com/Support/SupportTicket.aspx |
Amigo Pos back office can be used to connect to the database of any remote location that uses MS SQL Server 2008. Each location must have a broadband connection with sufficient bandwidth to allow proper operation of a VPN (Virtual Private Network). Multi-store functionality is intended for back office only. Order entry or other front-of-house features are not available.
Network Setup
If using VPN capable routers at each remote location, unblock the router port to allow SQL Server to connect to the office PC. Then use the remote router IP address followed by the SQL Server instance when specifying the SQL Server name below, i.e. 128.128.128.128\SQLExpress.
If VPN routers are not available, use VPN client software to create a virtual network. Install the client on each remote database server and on the office PC. Two methods are available:
| 1. | Create a separate network from the office PC to each remote location. This method requires the user to manually switch networks using the VPN client before selecting the remote location in Amigo Pos |
| 2. | Create a single network to connect all remote locations to the office PC simultaneously. If this method is used, verify that all networked machines have a unique Windows name. |
The following example describes the process of connecting a laptop to a remote database server using the popular Hamachi VPN client.
| 1. | Install Hamachi on both the laptop and the remote database server and create a network |
| 2. | On the laptop, click the "Power" button on the Hamachi client and enter a machine name, i.e. MyOfficePC. After the machine is registered, click the Create a new network button and enter a unique name and set a secure password, i.e. MyRestaurantGroup |
| 3. | On the remote database server, click the "Power" button on the Hamachi client, enter a machine name such as MyRestaurant and click the Join an existing network button. Enter the network name and password created in Step 2. Both machines are now connected. |
| 4. | On the remote database server, verify that the TCP/IP protocol is enabled for SQL Server using the SQL Server Configuration Manager. Note that TCP/IP is disabled by default and must be enabled manually, requiring that SQL Server is shut down and restarted. Also verify that the firewall settings allow SQL Server to communicate on the network. |
| 5. | In the SQL Server name field described below, use the database server's IP Address as shown next to the remote location name (i.e. MyRestaurant) in the Hamachi client and the database server instance name, i.e. 128.128.128.128\SQLExpress. The login and password are identical to those used at the local pos station. |
Amigo Pos Multi-Store Setup
Install Amigo Pos on the office PC or laptop that will be used to connect to remote locations. Use the default MS Jet database option and login with #2. Delete all Amigo Pos desktop and start menu shortcuts except for back office and database settings.
All locations must have the exact same version of Amigo Pos installed to prevent the database from being updated to include new features while some locations are still using older versions of Amigo Pos.
Multi-Store Configuration
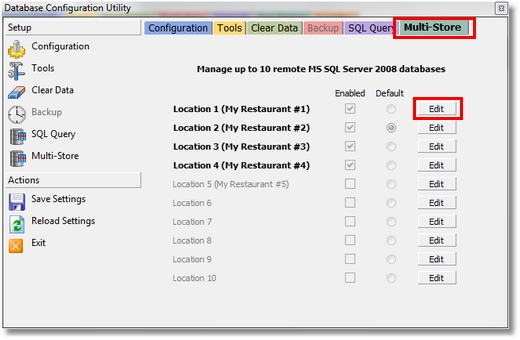
Open back office and navigate to Configuration > Database Settings. Click the multi-store tab. Click the Edit button next to Location #1 row to open the editor. Confirm that you have clicked on the correct row (the location number is shown at the top). All fields are required as described below.
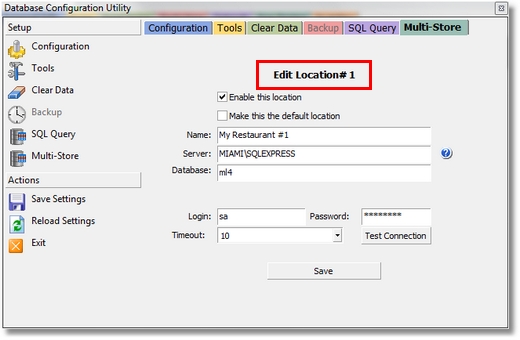
Location Editor
| • | Enable this location: Check the box to make this location visible on the Multi-Store toolbar at the top right. |
| • | Make this the default location: Check the box to force back office to attempt to connect to this location at startup. One and only one default location must be specified to connect properly at startup. If this value is left unchecked for all enabled locations, back office will connect to the local database server at startup. |
| • | Name: Enter a user friendly name for this location to appear on the button contained in the Multi-Store toolbar |
| • | Server: Enter the remote location SQL Server IP Address and instance, i.e. 128.128.128.128\SQLExpress |
| • | Database: Enter the remote location SQL Server database name. |
| • | Login: Enter the remote location SQL Server login. |
| • | Password: Enter the remote location SQL Server password. |
| • | Timeout: Select the remote location timeout in seconds. Enter a value that is long enough to avoid connection errors, but no so long that the user is forced to wait an unreasonable time period for an error, as the Amigo Pos user interface is not enabled during the connection process. 10 to 20 seconds is recommended. |

Back Office Menu Bar
Shut down and restart back office. Back office should attempt to automatically connect to the default remote location. The Click the Multi-Store tab to view the enabled remote location(s). At least one remote location must be enabled for the Multi-Store tab to appear. Click any button to change locations. A delay may occur on slower connections. Upon successful connection, the business name shown at the top of back office will be updated to verify that you are connected to the new location. If the new connection attempt fails, Amigo Pos will continue using the current remote connection, if any.
Page url: http://www.amigopos.com/help/html/index.html?multiple_stores.htm