Navigation: Menu Setup and Usage > Bar Menu >
Bar Menu Setup


|
Navigation: Menu Setup and Usage > Bar Menu > Bar Menu Setup |
|
The Amigo Pos 7bar menu is similar in structure to the regular menu with the exception that item modifiers are assigned to bar categories and that tax rates are assigned to an entire menu category. Similar to regular menu optional price levels, up to 6 bar menu upcharge levels are available for each bar category, with the price for each upcharge defined per bar menu item, for a possible total of 7 price definitions per bar menu item (1 regular price + 6 upcharge prices).
Most users will find it useful to modify the existing bar menu included with Amigo Pos 7. The default menu includes most common bar menu categories and items with various combinations of upcharge levels, special pricing, button sizes, images, and other customizations that demonstrate most common features.
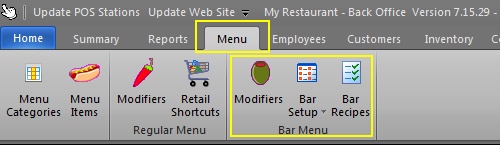
Back Office Bar Menu Setup
Bar menu categories are defined in the regular menu categories grid, as described in the menu categories help topic.
In addition to the fields described in the Regular Menu Categories topic, each bar category definition contains the following fields. Note that the tax rate and upcharge fields appear only for menu categories set to the Bar Menu menu type.
| • | Large Buttons: When set to Yes, 6 bar menu item buttons per screen are used, 20 are used when this value is set to No |
| • | Bar Menu Tax Rate: The tax rate id used to calculate taxes for every item assigned to this category. This value is only used for the bar menu (the regular menu tax rate is set for each item individually) |
| • | Upcharge (1-6) Enabled: When set to true, the upcharge button will appear when this category is chosen. Each bar menu item in this category must have a price defined for each enabled upcharge level |
| • | Upcharge (1-6) Description: A brief description of the upcharge to appear on the button, prep text and customer receipt |
| • | Upcharge (1-6) Prefix: The text to print before the menu item name when the upcharge is selected (i.e. DBL Vodka Tonic) |
| • | Upcharge (1-6) Suffix: The text to print after the menu item name when the upcharge is selected (i.e. Scotch UP) |
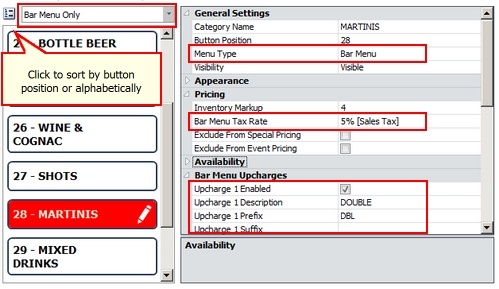
Menu Categories Editor
Check the box next to Large Buttons to show 6 bar menu items per screen. The following example also has the value of Show Caption unchecked to suppress the button text.
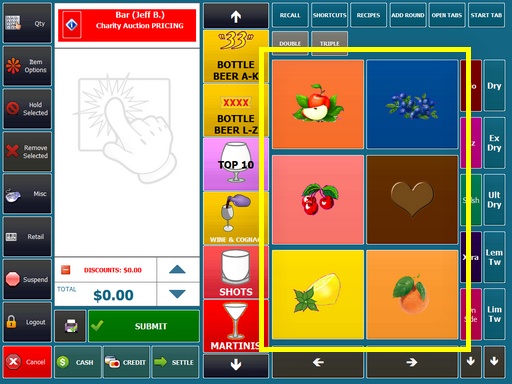
Large Menu Item Buttons
Set the value of Large Buttons to No (unchecked) to show 20 bar menu buttons per screen.
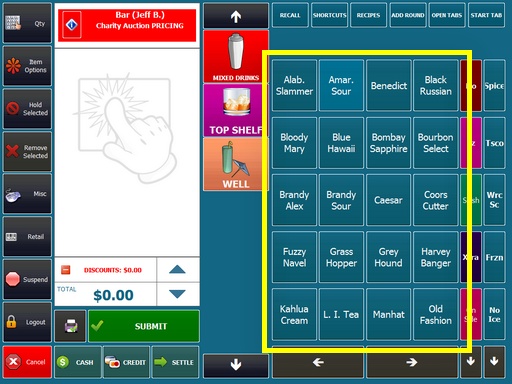
Normal Size Menu Item Buttons
An unlimited number of menu items are available for each bar category. Up to 7 prices are available for each item if upcharge levels are enabled for the bar menu category. Each menu item's button appearance can be fully customized with colors. font and a bitmap image. In addition, points can be assigned to the item for use by the loyalty card program.
Occasionally, it may be desirable to move a category to a higher screen, such as seasonal bar menu items. Since each bar menu item is assigned to a bar category id, not a bar category name, the bar menu item category assignment must be updated when moving a bar category to a different button. The update can be performed easily by clicking the Change Category button, selecting both the existing and new categories. All bar menu items in the existing category are moved to the new category.
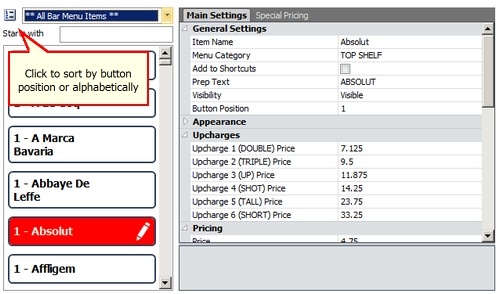
Bar Menu Items
Each bar menu item definition contains the following fields:
| • | Item Name: The text that appears on the bar menu item button and the custom receipt |
| • | Prep Text: The text to print on remote prep orders and that appears on remote displays |
| • | Visibility: The button may be visible, hidden (disabled), or act as a spacer for less cluttered screens |
| • | Button Position: The button's relative position in relation to other bar menu item buttons (hidden buttons are ignored) |
| • | Menu Category: The bar menu item's category assignment |
| • | Price: The bar menu item's price |
| • | Upcharge (1-6): When the category has Upcharge 1-6 enabled, specify the price to use for each enabled upcharge |
| • | Prep (1-10): Specifies which remote printers and displays to send this bar menu item |
| • | Label (1-5): Specifies which label printers to send this bar menu item |
| • | Button Color: The bar menu item's background color |
| • | Font Color: The bar menu item's text color |
| • | Show Caption: Specify whether the item name is visible on the button |
| • | Text Align: Specify the button's horizontal text alignment |
| • | Text Position: Specify the button's text alignment in relation to the button image, if used |
| • | Image Alignment: Specify the button's image position |
| • | Font Size: Select the relative font size to use for the bar menu item button text |
| • | Font Bold: Select whether to use bold font for the bar menu item button text |
| • | Font Italic: Select whether to use italic font for the bar menu item button text |
| • | Button Image: Select the bitmap image to use as the button background image, if any. This image must already exist in the database. To use a new image, open the image management utility and import the image into the Bar images category |
| • | Recipe Image: Reserved for future use; select the recipe image to use on remote displays and the recipe detail screen. This image must already exist in the database. To use a new image, open the image management utility and import the image into the Bar images category |
| • | Bar Recipe: Reserved for future use; select the recipe to use when viewing the recipe on remote displays. This recipe must already exist in the database. Use the bar recipe editor to add new or edit existing recipes. |
| • | Loyalty Point Value: Specify the number of loyalty points awarded when this bar menu item is added to the order. |
| • | Loyalty Point Redemption: Specify the number of loyalty points required for the customer to obtain this item using a loyalty card |
An unlimited number of menu item modifiers are available for each bar category.
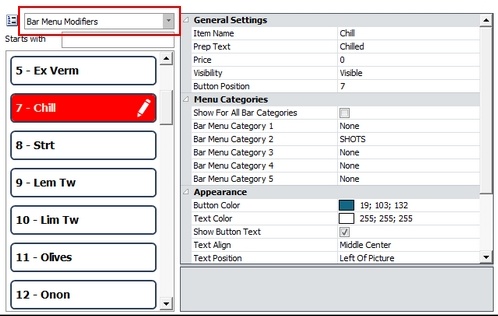
Bar Menu Modifiers
Each bar optional item definition contains the following fields:
| • | Bar Optional Name: The text that appears on the optional item button and the custom receipt. Each item must have a name (do not leave blank) |
| • | Prep Text: The text to print on remote prep orders and that appears on remote displays |
| • | Visibility: The button may be visible, hidden (disabled), or act as a spacer for less cluttered screens |
| • | Button Position: The button's relative position in relation to other bar menu item buttons (hidden buttons are ignored) |
| • | Price: The bar optional item's price |
| • | All Categories: Specify whether this optional item should be active for all bar menu categories |
| • | Category (1-5): Specify the individual categories (up to 5) for which this optional item should be active |
| • | Button Color: The bar optional item's background color |
| • | Font Color: The bar optional item's text color |
| • | Show Caption: Specify whether the optional item name is visible on the button |
| • | Text Align: Specify the optional item button's horizontal text alignment |
| • | Text Position: Specify the optional item button's text alignment in relation to the button image, if used |
| • | Image Alignment: Specify the optional item button's image position |
| • | Font Size: Select the relative font size to use for the bar optional item button text |
| • | Font Bold: Select whether to use bold font for the bar optional item button text |
| • | Font Italic: Select whether to use italic font for the bar optional item button text |
| • | Button Image: Select the bitmap image to use as the button background image, if any. This image must already exist in the database. To use a new image, open the image management utility and import the image into the Bar images category |
Bar prep instructions are used to add a prefix to a modifier. For example, the modifier name may be ICE, and the optional prefix may be NO or EXTRA.
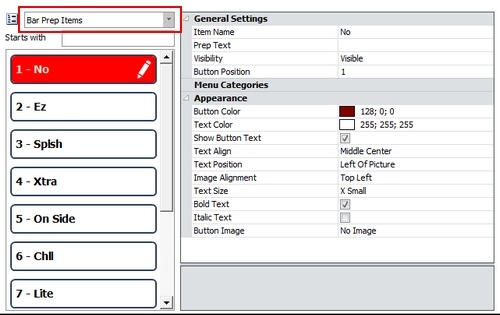
Bar Menu Prep Items
Each bar prep instruction definition contains the following fields:
| • | Bar Instruction Name: The text that appears on the optional item button and the custom receipt. Each item must have a name (do not leave blank) |
| • | Prep Text: The text to print on remote prep orders and that appears on remote displays |
| • | *Visibility: The button may be visible, hidden (disabled), or act as a spacer for less cluttered screens |
| • | Button Color: The bar optional item's background color |
| • | Font Color: The bar optional item's text color |
| • | Show Caption: Specify whether the optional item name is visible on the button |
| • | Text Align: Specify the optional item button's horizontal text alignment |
| • | Text Position: Specify the modifier item button's text alignment in relation to the button image, if used |
| • | Image Alignment: Reserved for future use; specify the modifier item button's image position |
| • | Font Size: Select the relative font size to use for the bar modifier item button text |
| • | Font Bold: Select whether to use bold font for the bar modifier item button text |
| • | Font Italic: Select whether to use italic font for the bar modifier item button text |
*Note: If all bar menu prep items are set to Hidden or no bar prep items are defined, the bar modifier buttons will stretch to twice there normal width to fill the gap, as show below.
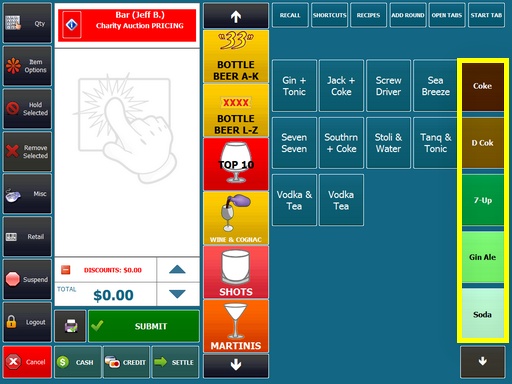
Double-Width Modifier Buttons
Special pricing based on time and/or day can be applied to individual bar menu items or entire bar menu categories.
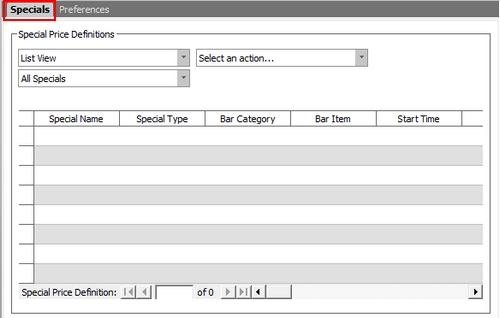
Add a new bar menu specials - Enter a new bar special definition on the top line of the grid when in List View mode
Each bar special price definition contains the following fields:
| • | Special Name: A user friendly name to appear on the order entry screen specials list |
| • | Special Type: Specify the scope or the special, i.e. bar item or bar category |
| • | Bar Category: If it is a category special, select the category |
| • | Bar Menu Item: If it is an individual item special, select the item from the list |
| • | *Start Time: The time that the special becomes active |
| • | End Time: Time that the special becomes inactive. If the End Time is less than the Start Time, it is considered to be the next calendar day, allowing time ranges such as 11:00PM - 2:00AM |
| • | Day Of Week: The special may apply to all days or any single day. If more than 1 day and less than 7 days are required, enter the identical special multiple times, selecting a different day each time. |
| • | Price Method: Specify whether this is a fixed or percentage off discount. |
| • | Amount: Enter the discount amount (use a decimal when percentage discounts are in use) |
| • | Apply Discount To Modifiers: Specify whether to apply the discount to the bar item's modifiers (percentage discount only) |
| • | Show On List: When the discount is active, show this discount on the order entry screen Bar Specials screen |
| • | Disable: Set to True to temporarily disable this discount |
To add a new special price definition, select Add New Special from the drop-down list to open the special editor dialog. To edit an existing special price definition using the dialog editor, double-click on the grid row header.
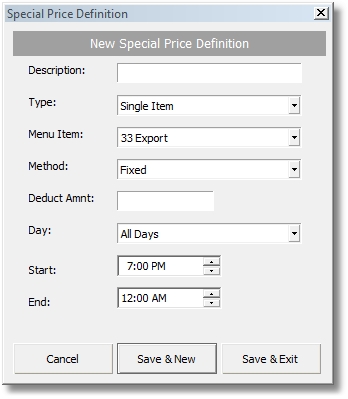
Bar Special Editor
Many bar menu preferences are defined under the preferences tab. Other preferences are also available in Back Office > Configuration > Main Settings >User Interface.
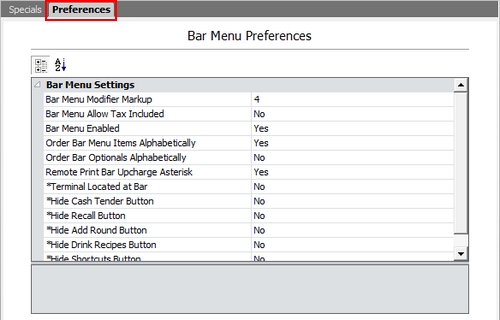
Bar Menu Preferences
The bar menu preferences grid contains the following fields:
| • | Bar Menu Modifier Markup: Enter a numeric value to use when calculating the suggested price on the inventory screen for bar menu modifiers |
| • | Bar Menu Allow Tax Included: Set to No to charge tax on bar menu items for order types that are configured to be tax inclusive |
| • | Bar Menu Enabled: Enable the bar menu on the order entry screen |
| • | Order Bar Menu Items Alphabetically: Set to No to use button position value to order bar menu items on the order entry screen |
| • | Order Bar Modifiers Alphabetically: Set to No to use button position value to order bar modifier and prep item buttons on the order entry screen |
| • | Remote Print Bar Upcharge Asterisk: Set to Yes to print an asterisk before and after the upcharge description when sent to prep printer |
| • | *Terminal Located at Bar: Set to Yes to disable printing prep tickets for bar menu items entered at this pos station. Local setting: configure at each pos station |
| • | *Hide Cash Tender Button: Set to Yes to disable bar menu (speed bar) cash tender button Local setting: configure at each pos station |
| • | *Hide Recall Button: Set to Yes to disable bar menu (speed bar) recall. Local setting: configure at each pos station |
| • | *Hide Add Round Button: Set to Yes to disable bar menu (speed bar) add round button. Local setting: configure at each pos station |
| • | *Hide Drink Recipes Button: Set to Yes to disable bar menu drink recipes button. Local setting: configure at each pos station |
| • | *Hide Shortcuts Button: Set to Yes to disable bar menu shortcuts button. Local setting: configure at each pos station |
*Settings with an asterisk apply to the local pos station only
Page url: http://www.amigopos.com/help/html/index.html?bar_setup.htm