Navigation: Database > MS SQL Server > Manual Installation >
Configure Amigo Pos


|
Navigation: Database > MS SQL Server > Manual Installation > Configure Amigo Pos |
|
Complete the following steps to configure Amigo Pos to use MS SQL Server as the database engine. Do not complete this section until MS SQL Server has been installed (and configured successfully) and the database is created.
Database Configuration Utility
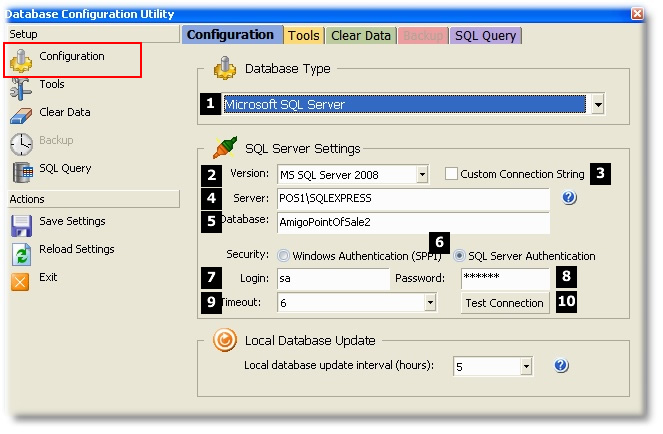
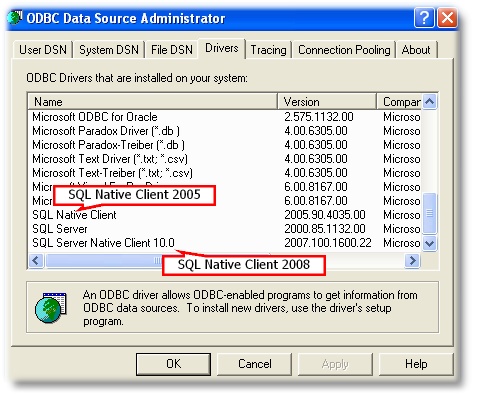
1. Open the database configuration utility from the Windows Start Menu and select Microsoft SQL Server from the drop-down list. Select the version of SQL Server database driver to use, as shown in box #2 above. If you are unsure, open Control Panel - Administrative Tools - Data Sources and refer to the following image. SQL Native Client 2005.x.x.x is used by MS SQL Server 2005, SQL Server Native Client 10.0 2007.x.x.x is used by MS SQL Server 2008. Note that Amigo Pos installs SQL Server Native Client 10.0 by default.
Database Configuration Utility
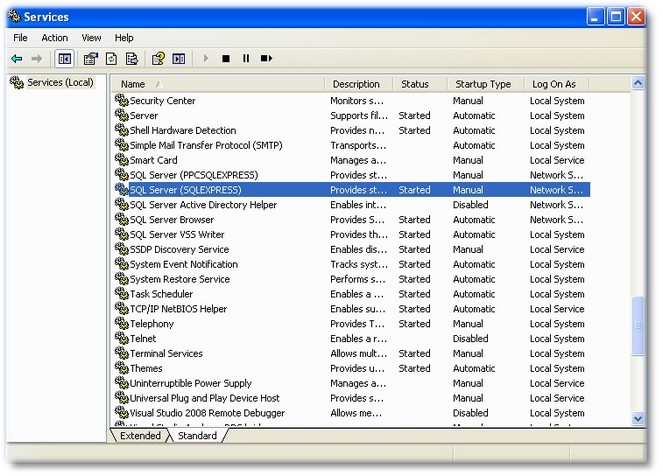
2. Enter the Database Server name and Instance, separated by a back slash as shown above in box #4. The server name is the name of the PC as shown in the Windows Control Panel System applet. In this case the PC is named POS1. The instance name is set during SQL Server installation and can be determined by opening the Services applet in Windows Control Panel | Administrative Tools, as shown below. In this case, there are 2 instances installed. The instance used by Amigo Pos is SQLEXPRESS. The server name is POS1\SQLEXPRESS, as shown above in box #4.
Windows Services Applet
3. Enter the database name as described in the previous topic. In the case, the database is named AmigoPointOfSale as entered in box #3.
4. Select the mode of security. If multiple POS Stations (and/or back office machines) exist on a simple Windows network, use SQL Server Authentication, as it is the easiest to configure. If SQL Server resides on the same PC that is being configured or a domain is used, Windows Authentication can be used with little or no additional configuration.
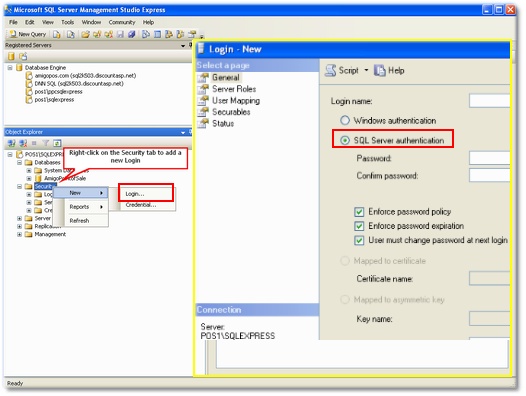
5. Enter the Login Name. The default Login created during setup is sa but may be disabled. For extra security leave this account disabled and create a new Login. The sa account can be enabled or additional Logins can be added by using SQL Server Management Studio Express, as shown below. Use SQL Server Authentication when creating a new login
Adding a new SQL Server Login in SQL Server Management Studio
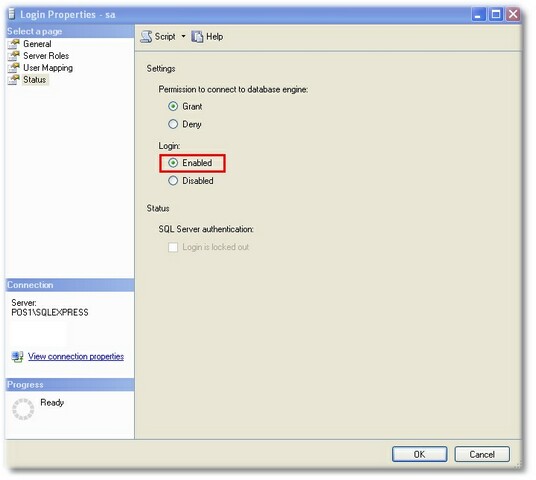
Enable the sa account in SQL Server Management Studio
6. Enter the Password that was created during installation or when adding new users in the previous step.
7.Select the Timeout value. This is the time in seconds that Amigo Pos will attempt to connect to the database server before raising an error. A low value may cause excessive errors on slow networks; a high value will result in excessive wait time before the error is raised; Amigo Pos will be unresponsive to mouse clicks during this timeout period. In most cases, a value between 5-15 seconds is adequate.
8. Click Test to confirm that the connection parameters are correct. If the connection is not established within the Timeout interval specified in the previous step, an error message will appear below the Test button. The error message is also saved to the error log and can help the technical support personnel resolve the issue.
Note that that the SQL Server connection string used when clicking the Test button uses the values in the boxes, not the parameters saved in the system registry. If the connection is successful, click Save Settings to store the parameters.
Page url: http://www.amigopos.com/help/html/index.html?sql_amigo_point_of_sale_configure.htm