Navigation: Program Settings >
Seating Chart Designer


|
Navigation: Program Settings > Seating Chart Designer |
|
Amigo Pos includes an intuitive drag & drop seating chart designer for rapid floor plan entry. The seating chart designer is a stand-alone program that is accessed by clicking on the Seating Chart Designer shortcut in All Programs > Amigo Pos or in Back Office > Configuration > Seating Charts.
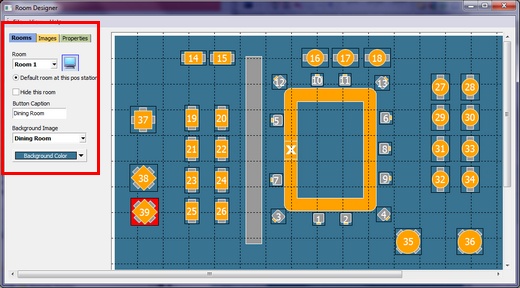
Seating Chart Designer in designer mode
To edit a seating chart:
| • | Select the chart from the drop-down list. A maximum of 5 distinct floor plans are available. |
| • | Enter a new name, if necessary. The name appears on the seating chart button(s) on the order entry screen. |
| • | Select a color for the background. The color appears in areas where is background image is transparent, as determined by the mask color defined for the image. |
| • | Select a background image, is applicable. The background image may contain items that are not selectable, such as walls, entryways, bars or counters. New background images may be added by opening the image editor and adding images to the Room Layouts category. |
| • | Uncheck the box next to Disable this room |
| • | Check the box next to Make default room on this pos station if the room should appear each time a Dine-In order is started on the local pos station (this setting must be configured on each pos station). |
| • | Click Save to commit the changes |
| • | To view grid lines and table borders for easier image placement, toggle the Preview button to the off position. Grid line color and placement can be modified by clicking Grid Preferences... under the View menu button. |

Editing grid color and placement
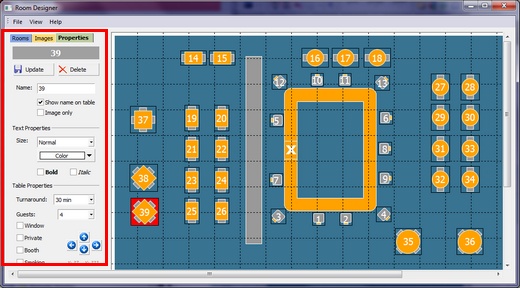
Table Properties
Drag a table from the image list to the floor plan. Each table is customizable as follows:
| • | Name: A user friendly name to appear on the table button, prep tickets, customer receipts and reports |
| • | Caption Visibility: Indicates whether the name is visible on the table button (the name is always visible when in Design mode) |
| • | Image Only: Indicates whether this image is a table or a non-selectable image |
| • | Text Size: The font size |
| • | Text Color: The font color |
| • | Text Bold: Check box to use bold font |
| • | Text Italic: Check box to use italic font |
| • | Turnaround: Reserved for use with the upcoming reservations module. Indicates the average time that the table is occupied (from the time that the initial order is submitted) |
| • | Default Guest Number: The default number of guests to use when the table is selected |
| • | Window: Reserved for use with the upcoming reservations module. Check box if this table is near a window. |
| • | Private: Reserved for use with the upcoming reservations module. Check box if this is a private table. |
| • | Booth: Reserved for use with the upcoming reservations module. Check box if this table is a booth. |
| • | Smoking: Reserved for use with the upcoming reservations module. Check box if the table is in the smoking section |
Click the Update button to save any changes. Note the the table borders correspond to the image size. Table placement is shown at the bottom left in pixels. To achieve exact placement, use the arrow buttons to nudge the table 1 pixel in any direction. Ensure that the tables do not overlap. Note that clicking the Update button is not required when moving a table; position changes are automatically saved. Additional table images can be added to the list by opening the Image Editor and adding images to the Seating Chart category.
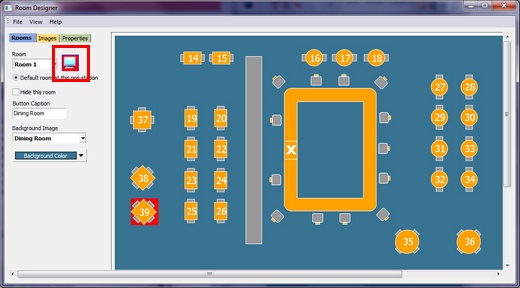
Seating Chart Designer in preview mode
Page url: http://www.amigopos.com/help/html/index.html?seating_chart_designer.htm