Navigation: Quickbooks Interface >
QuickBooks Settings


|
Navigation: Quickbooks Interface > QuickBooks Settings |
|
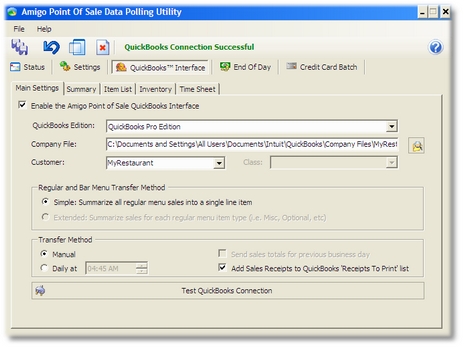
the Amigo Pos QBI settings must be configured to work with your existing QuickBooks company file. The QuickBooks company file is a database that contains all company settings and sales data. This file is created the first time Quickbooks is run after installation, or by clicking File - New Company... on the top menu bar in the QuickBooks GUI.
|
QBI Settings Dialog |
Note: Ensure that the blue Save button at the top left is pressed after any changes are made or the Amigo Pos QBI will use the previous settings to attempt any transfers.
QuickBooks Company File
the Amigo Pos QBI settings must be configured to work with your existing QuickBooks company file. The QuickBooks company file is a database that contains all company settings and sales data. This file is created the first time Quickbooks is run after installation, or by clicking File - New Company... on the top menu bar.
QuickBooks Customer
Th QuickBooks customer is the customer used on the sales receipt that the Amigo Pos QBI sends to QuickBooks. This customer should be the name of the business.
For businesses with more than one location, you may use multiple customer names, one customer for each location. An alternative is to use a QuickBooks class, described below.
QuickBooks Class (Not required)
The QuickBooks class can also be used to track sales from multiple locations using a single company file. Each class corresponds to a location. This value is optional but recommended for businesses with multiple locations.
QuickBooks Accounts
Each QuickBooks Item is assigned to a Quickbooks account. In QuickBooks, click CTL-A to view the chart of accounts. Accounts may be categorized as asset, expense, cost of goods sold, etc. Amigo Pos does not interact directly with QuickBooks accounts, but care must be taken to assign each item to the proper account or errors will result.
Settings Notes
Some settings may not be available unless other settings are enabled first. For example, if the Enable the Amigo Pos QuickBooks Interface was not previously checked, the settings under the Inventory and Time Sheet tabs will be disabled. Check the box and click the Save button to enable other options.
The Send sales totals for previous business day setting is intended for 24-Hour operations so that current business day's sales data is never sent to QuickBooks due to the pos being used during the transfer. This setting affects both automatic and manually initiated transfers.
The Add Sales receipts to QuickBooks 'Receipts To Print' List setting will show recent sales receipts on the Company Snapshot screen in QuickBooks.
Inventory and Time Sheet is not available for QuickBooks Simple Start users.
The Combine all days on a single sales receipt setting is recommended when transferring a large number of days Click the Save button after changing this setting and before performing a transfer. If this setting is not enabled, allow up to 2 minutes to transfer each business day selected.
If the Add New Employees to QuickBooks before each update setting is not enabled, time sheet data for new employees will be rejected by QuickBooks.
Page url: http://www.amigopos.com/help/html/index.html?quickbooks_settings.htm