Navigation: Peripherals >
Maxim iButton


|
Navigation: Peripherals > Maxim iButton |
|
Introduction
The iButton is a computer chip enclosed in a 16mm thick stainless steel can. An iButton uses its stainless steel 'can' as an electronic communications interface. Each iButton has a unique and unalterable address laser etched onto its chip inside the can. The address (e.g. 2700000095C33108) can be used as a key or identifier for each iButton. Since Amigo Pos only uses the iButton for identification and does not write to the iButton, the less expensive read-only iButton can be used, although any iButton is compatible.

Maxim iButtons and iButton Key Ring Mounts
iButton Reader
One iButton reader, also called a receptor or probe, is required for each pos station. These inexpensive devices are available from various vendors in many styles and some vendors integrate the iButton reader into all-in-one pos stations. Additional information is available at the Maxim product page. Since Amigo Pos only uses the iButton for identification (similar to fingerprint login), the iButton is not required to remain in the reader after login. Although the iButton reader is available with various interfaces, the USB interface is strongly recommended for easy setup.
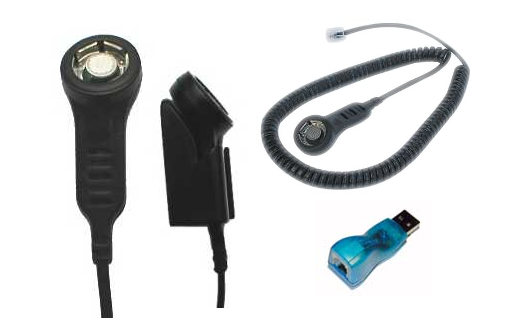
Maxim iButton Touch-and-Hold Probe (shown with Cradle and USB Adapter)
Driver Installation
The iButton reader requires Maxim 1-Wire drivers to be installed on the PC so that the reader is recognized. Obtain the 1-Wire drivers from the Maxim 1-Wire drivers download page by selecting the operating sytem from the drop down list. The Amigo Pos iButton interface has been tested with both 32- and 64-bit 1-Wire drivers. Install the drivers before connecting the reader. After the drivers are installed, connect the reader to any available USB port to complete installation and restart Amigo Pos. Note that Amigo Pos should be restarted any time an iButton reader is connected to the pos station.
Back Office Setup
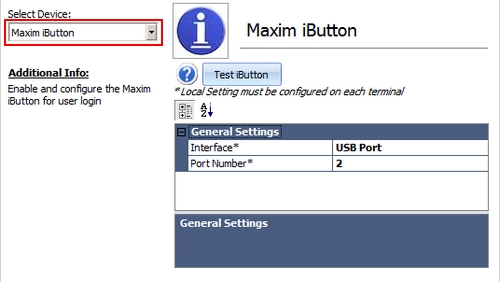
After the drivers are installed and the reader is connected to the pos station, open Back Office > Configuration > Peripherals and select Maxim iButton from the drop-down list. Select the interface type and the port. The default port for most iButton readers is 1. Click the Test button and press an iButton against the reader to confirm that the device is recognized. If the test is unsuccessful, use trial and error to determine the correct port number. Repeat the setup procedure at any additional pos stations with an iButton reader.

Back Office > Configuration > Peripherals
User Interface
After the iButton has been tested at each pos station, open Back Office > Configuration > Main Settings > User Interface and verify that the iButton login method is enabled. Amigo Pos must be restarted after enabling this login method.
iButton Login Configuration Screen
User Login
To assign an iButton to a user, open Back Office > Employees and select the employee from the drop-down list. Highlight the iButtonSN field and press the Add New to show the iButton entry dialog. Press the iButton against the reader and press the Save buttonto assign the iButton's serial number to the selected employee. Click the Update Pos Stations at the top left so that the employee can begin using the iButton for logging in. The same iButton cannot be assigned to 2 users. If the iButton is to be reused, highlight the iButton SN field and click the Delete button for the previous user before assigning the button to the new user.

Back Office Employees Shortcut
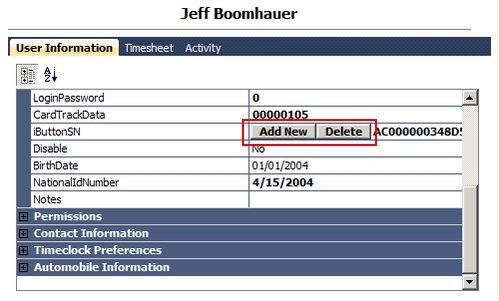
Employee Editor
Page url: http://www.amigopos.com/help/html/index.html?maxim_ibutton.htm