Navigation: Hotel Interface >
Hotel Interface Setup


|
Navigation: Hotel Interface > Hotel Interface Setup |
|
Thank you for using this beta feature. Please submit any issues or concerns via support ticket at http://amigopos.com/Support/SupportTicket.aspx |
Introduction
Amigo POS is capable of posting room charge transactions to Micros 4700 compatible property management system posting interfaces using TCP/IP or a serial port interface. Please confirm that the interface works with your property management system external posting interface before purchasing Amigo Pos.

Back Office > Configuration > Hotel Interface

Hotel Interface Setup & Testing
Serial Communications
Serial communications should be used only when the POS Station is in close proximity to the property management system external posting interface and a TCP/IP communications are not available in the EPI. Use a NULL modem (RS-232) cable less than 50 feet long to connect the POS to the EPI. A NULL modem adapter can be used with a standard serial cable if a NULL modem cable is not available. The interface should be set to run at 9600 Baud, 8 Data Bits, 1 Start Bit and 1 Stop Bit with no parity checks. No flow control should be used unless necessitated by the use of serial port adapters (such as USB to RS-232 adapters). The serial port settings in Windows Device Manager should be identical on the POS and EPI machines. There are no default settings in the Amigo Pos setup dialog and each setting must be set explicitly by the use.
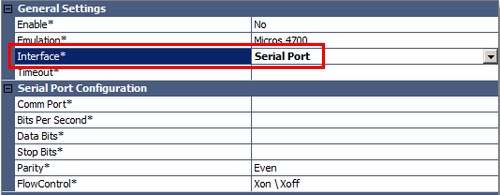
Serial Communications Settings
TCP/IP Configuration
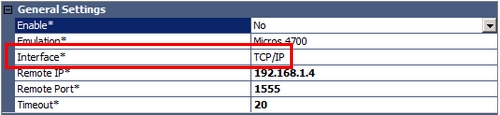
In Amigo Pos back office, click the Hotel Interface button under the configuration button group. For emulation, select Micros 4700 from the drop-down list. Select TCP/IP as the interface type. Click the IP Settings tab. If Amigo POS is installed on the same machine as the pms external posting interface, enter 127.0.0.1 for the IP address. Otherwise, enter the IP address on which the posting interface is installed. For the port setting, enter 1555 or any other unused port on the local PC. Verify that the firewall at each pos is configured to allow an exception for Amigo Pos and the external posting interface (for the remote port). On the external posting interface, enter the IP address of the machine on which Amigo POS is installed. Enter the same port number you entered in the previous step. Note that a separate session must be created for each pos station that is used to post room charges.
TCP/IP Communications Settings
Settings
General Settings
Enable*: Set to Yes to enable the hotel interface at this pos station
Emulation*: This beta release supports Micros 4700 only
Interface*: Select the interface type (only TCP/IP available in this beta release)
Timeout*: Enter the timeout value in seconds
TCP/IP Settings
Remote IP*: Enter the remote IP (127.0.0.1 for local pc) for the external posting interface
Remote Port*: Enter the remote port (default 1555) for the external posting interface
Serial Port Settings
Comm Port*: Select the com port on the local PC that the null modem cable is connected to
Bits Per Second*: The default setting for most systems in 9600 Bits Per Second
Data Bits*: The default value of 8-bits is required by most external posting interfaces (10-bit word frames consisting of 1 start bit, 8 data bits and 1 stop bit)
Stop Bits*: The default value of 1-bit is required by most external posting interfaces
Parity*: Set to No parity check for most external posting interfaces
FlowControl*: Set to None, as no flow control is generally required
Signature Slip Settings
Room Charge Signature Slip Disclaimer 1: Text to print immediately below signature line on the room charge signature slip - leave blank to omit
Room Charge Signature Slip Disclaimer 2: Text to print on 2nd line below signature line on the room charge signature slip - leave blank to omit
Room Charge Auto Print Pending Signature Slip: Set to Yes to print a signature slip immediately after the folios are retrieved
Room Charge Auto Print Post Signature Slip: Set to Yes to print a signature slip immediately after a successful post
Room Card Settings (similar to gift card setup shown here)
Room Charge Card Start Sentinel: Enter the character that indicates the start of the track
Room Charge Card End Sentinel: Enter the character that indicates the end of the track
Room Charge Card Length: Enter the length of the room number (maximum of 4 characters are sent to posting interface
Room Charge Card Start Position: Enter the start position of the room number
Room Charge Card Track: Enter the track number that contains the room number
User Interface
The room charge screen can be accessed on the order settlement screen payment types list or directly on the main screen under the Open Order buttons. In order to view the Room Charge button on the main screen under the "Open Orders" button group. navigate to Back Office > Configuration > Main Settings > User Interface and click the Order Buttons tab. Uncheck the box under the Disabled column next to the Room Charge row and click the Enter key on the keyboard. Click the Update Pos Stations at the top left so synchronize the database so that a program restart is not required.
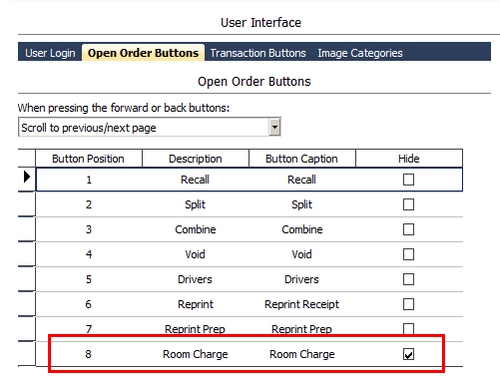
Main Screen Room Charge Button Setting
In order to view the Room Charge button on the settle screen payment types list. navigate to Back Office > Configuration > Main Settings > Settle Screen and uncheck the box under the Hide column next to the Room Charge row and click the Enter key on the keyboard. Click the Update Pos Stations at the top left so synchronize the database. A program restart may be required when changing this setting.
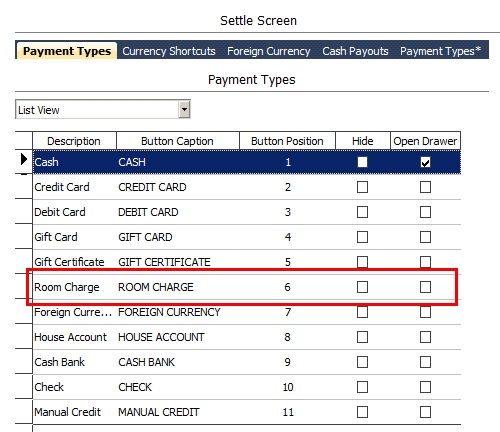
Settle Screen Room Charge Button Setting
Testing
Before testing, confirm that your Micros compatible property management system external posting interface is on-line and configured correctly. A separate session must be configured on your PMS for each terminal that is running the Amigo PMS interface. In Amigo Pos Back Office > Configuration > Hotel Interface, click the Test Settings tab and enter a valid room number and the amount to charge. Click the Inquire button to retrieve the valid folios for the room. Click the Post button to post the transaction. The results appear above the room number field. A successful test transaction response is not saved in Amigo Pos database and should be voided deleted from the property management system. Note that responses such as INVALID ROOM (room doesn't exist or is not occupied) or NO GUARANTEE (room does not have authorization for charge) indicate a successful configuration.
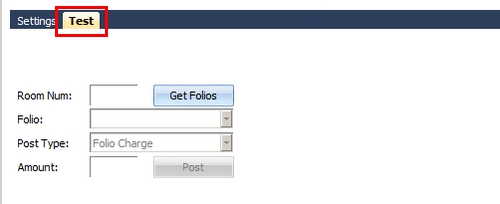
Hotel Interface Test Screen
Page url: http://www.amigopos.com/help/html/index.html?hotel_micros_pms.htm