Navigation: Peripherals >
Barcode Scanner


|
Navigation: Peripherals > Barcode Scanner |
  
|
Amigo Pos 7includes support for serial port (recommended) or keyboard wedge (USB or PS2) barcode scanners.

Back Office > Configuration > Peripherals
Select the scanner type to view additional details:
| • | OPOS |
Note for keyboard wedge interface scanner and magnetic card reader users: Amigo Pos supports both keyboard wedge magnetic card readers and keyboard wedge scanners. The output from keyboard wedge devices appears as text typed from a keyboard to both Windows and Amigo Pos. Since Amigo Pos does not force the user to select a text box or open a popup window before scanning a barcode or swiping a credit card, Amigo Pos must be able to determine if the output is from a magnetic card reader or barcode scanner. The simplest method is to append a character to the end of the barcode scan and append a single carriage return to the end of the card swipe.
The keyboard wedge scanner should be configured to send a special character after the barcode is scanned. It should not send a carriage return <CR> after the scan. Amigo Pos is already configured to recognize the ~ (tilda) as the special character. This character can be changed if necessary. Select Keyboard Wedge next to Scanner type in Back Office > Configuration > Peripherals >.
Most manufacturers provide a pdf program manual that can be downloaded from the manufacturer's web site, enabling you to print a series of barcodes that can be used to program the scanner. In general, the programming procedure consists of:
| 1. | Enter setup mode |
| 2. | Restore default settings |
| 3. | Remove trailing carriage return |
| 4. | Add termination character (i.e. tilda) |
| 5. | Exit setup mode |
Some scanners do not require all of the above steps. For example, the POS-X Xi3000 does not require the removal of the carriage return, as shown in the Xi3000 configuration sheet (printable pdf).
Right Way
Correct output in notepad from barcode scanner with no carriage return so that the cursor remains on the same line (the gray character is the screen cursor): 123456~ | |
Wrong Way
Incorrect output in notepad from barcode scanner with carriage return so that the cursor jumps to the next line (the gray character is the screen cursor): 123456 | |
After the scanner is programmed to suppress the carriage return and to send a termination character, click the Test Scanner button to confirm that the scanner is programmed correctly, as shown below. Note that the termination character does not appear on the scan. Amigo Pos always strips the termination character before displaying the barcode scan on any back office or front of house screen.

Keyboard Wedge Barcode Scanner Test
When installing a serial port barcode scanner that has manufacturer support for OPOS drivers, download and install the manufacturer's OPOS device drivers and setup utility. For example, Symbol barcode scanner users should download both the 123Scan Scanner Configuration Utility and the OPOS Driver for Symbol Scanners. Metrologic barcode scanner users should download the Metroset 2 configuration utility and MetrOPOS 2 (contains both Metrologic OPOS drivers and the MetrOPOS Administrator).
Using the configuration utility, the scanner should be programmed to:
| • | Send a carriage return <CR> after each scan |
| • | Interpret Code 39 barcodes |
Many scanners are already programmed to recognize Code 39 barcodes and send a carriage return after each scan. If unsure, open the MS Windows HyperTerminal program and connect to the barcode scanner's COM port. Print a customer receipt from Amigo Pos and scan the barcode into HyperTerminal.
After the scanner is configured, open the OPOS configuration utility and add the barcode scanner with a user-friendly device name. This is similar to the procedure for counter scale installation. Select OPOS next to Scanner type in Back Office > Configuration > Peripherals >.
Amigo Pos can communicate with the scanner directly through the serial port. Select Serial next to Scanner type in Back Office > Configuration > Peripherals >. Program the scanner to send a single carriage return after the scan. No other special termination characters are required. The default settings 9600,8,N,1 with no flow control are appropriate for most barcode scanners. Open Windows Device Manager to verify that the serial port settings match the scanner interface settings.

Serial Interface Scanner Configuration
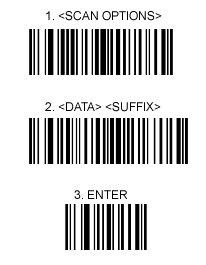
Most serial barcode scanners offer a user manual with instructions on adding a carriage return by scanning a series of barcodes. For example, the Motorola Symbol LS9208 serial port scanner (and similar Symbol scanners) with default factory configuration can be programmed to send a carriage return after the barcode by printing this topic and scanning the following 3 barcodes, one at a time, in the order shown.

Symbol LS9208 Carriage Return
Enable the barcode scanner in Back Office > Configuration > Peripherals > by selecting the correct scanner type and entering the OPOS name or Serial Port settings, where applicable. Refer to the following images for the most common configurations.
Keyboard Wedge Scanner
The wedge scanner shown below has a tilda (~) terminator

Keyboard Wedge Barcode Scanner Configuration
Serial Port Scanner
The serial port scanner shown below is connected to COM Port 2 and uses default settings (9600,8,N,1)

Serial Interface Barcode Scanner Configuration
OPOS Scanner
The OPOS scanner shown below is configured with device name POSSCANNER.

OPOS Barcode Scanner Configuration
Page url: http://www.amigopos.com/help/html/index.html?barcode_scanner.htm