Navigation: Peripherals >
Caller Id Box


|
Navigation: Peripherals > Caller Id Box |
|
Caller ID Box Configuration & Usage
Initial Setup
Amigo Pos can display incoming call information by utilizing the Whoozit® caller id box, available at http://www.callerid.com (Amigo Pos is not affiliated with callerid.com). Units are available for 1-8 lines and are capable of displaying a callers name and the line number. A single unit will share data with all pos stations on the network and the units may be interconnected for an unlimited number of lines. Amigo Pos maintains a record of customers' previous orders so that you will have access to a customer's previous activity while the phone is still ringing.
Callerid boxes are available with a choice of 2 interfaces:
1. Ethernet (Recommended): This type of box is connected directly to the network router and is easy to set up with Amigo Pos by simply enabling the device and entering the port number (default port 3520). Note that in order to avoid duplicate entries in the caller id log, only Pos Station 1 is used to save new calls to the caller id log when using the Ethernet Link caller id box.

The Ethernet Link version connects directly to the network, sending information to all computers at the same time (image courtesy callerid.com)
| • |
2. Serial Port: This type of box is connected directly to a pos station or back office pc, which then broadcasts the callerid data to other network pcs.
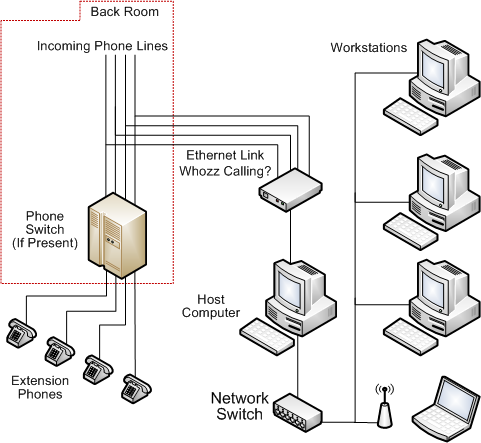
The serial port version connects to a single host computer. The host relays information to other computers on the network (image courtesy callerid.com)

Back Office > Configuration > Peripherals
Caller Id Box Configuration (Serial Port)
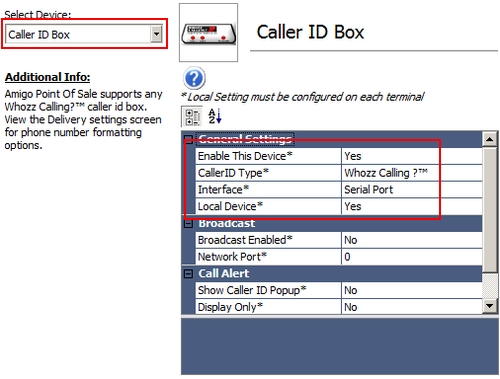
Although only one caller id unit is required for the entire network, the caller id settings must be configured on each POS station. First, install your caller id unit and be sure that all phone lines are securely inserted into the rear of the box, in consecutive order. If the number of lines is less than the maximum capacity, the highest numbered port will remain unused (for example, if you are using a 4-line box but only have 3 phone lines, the RJ11 port labeled Line 4 on the rear of the box is not used). Connect the serial cable from the box to the POS station and connect the AC adapter. If the pos station does not have a fee serial port, obtain a USB to Serial port converter.
After logging in as a manager or supervisor, open Back Office > Configuration > Peripherals > and select Caller Id from the drop-down list. First, check the box next to Enable this device. If the caller id unit is physically connected with an (RS-232 serial cable) to the pos station that you are configuring, select Yes next to Local Device (if the caller id unit is connected to another pos station, you select No).
Serial port settings should be copied from the serial port's settings window in the MS Windows Device Manager (default settings are 9600 Baud, 8 Data Bits, No Parity, 1 Stop Bit). If there are multiple pos stations on the network, select Yes next to Broadcast Enabled and enter a free network port (the default broadcast port is 6699). Repeat on any additional pos stations, setting the value for Local Device to No.
Ethernet Interface
CallerId.Com Ethernet Link caller id boxes eliminate the need to connect the caller id box directly to the PC and instead are connected directly to the router. The settings on each PC are identical. Navigate to Back Office > Configuration > Peripherals > and select Caller Id from the drop-down list. Select Yes to enable the device, Specify the Ethernet interface and enter 3520 as the port number as shown below. The next paragraph describes the procedure to add a firewall exception, a necessary step for proper operation.
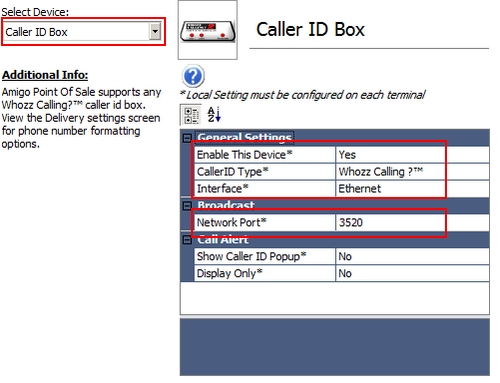
Ethernet Caller Id Box Configuration
Finally, add an exception to the Windows Firewall to open port number 3520 using the UDP (not TCP) protocol. The firewall settings can be accessed from the Windows Control Panel > Network and Sharing Center (or right-click on the desktop Network icon and select properties to open the Network and Sharing Center). Click here for instructions on adding a Windows 7 firewall exception.
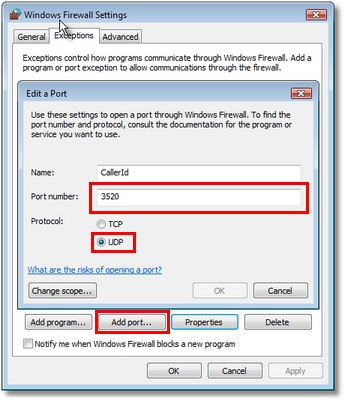
Adding an exception to the Windows Firewall
Usage
After the caller unit is configured, exit back office and restart Amigo Pos. Call any of the connected lines and a small message window will appear at the bottom of the screen indicating the name and the phone number of the incoming caller. Press the Delivery or Pick Up order type to view a list of the 20 most recent calls.
Page url: http://www.amigopos.com/help/html/index.html?caller_id_box.htm